RNA In Situ Hybridization for Detecting Gene Expression Patterns in the Abdomens and Wings of Drosophila Species

 ,
,
Abstract
:1. Introduction
1.1. Overview
1.2. Application of This Protocol
1.3. Advantages and Limitations
2. Experimental Design
2.1. Probe Design and Synthesis
2.2. Pupal Staging
2.3. Abdominal Epidermis Preparation
2.4. Pupal Wing Preparation
2.5. ISH of Drosophila Abdomens and Wings
2.6. Materials
- Distilled H2O
- Taq 2× MeanGreen Master Mix (Syzygy Biotech, Grand rapids, MI, USA, www.integratedscientificsolutions.com, (accessed on 9 March 2021))
- Agarose (Dot Scientific Inc., Burton, MI, USA, cat. no. AGLE500)
- TAE buffer (see Section 6)
- 1 mM dATP (Sigma-Aldrich, St. Louis, MO, USA, https://www.sigmaaldrich.com/ (accessed on 8 March 2021))
- 10× PCR buffer (Sigma-Aldrich, St. Louis, MO, USA, cat. no. P2192)
- Taq Polymerase (Thermo Scientific, Waltham, MA, USA, cat. no. EP0401)
- Gel extraction kit (Thermo Scientific, Waltham, MA, USA, cat. no. K0692)
- pGEM®-TEasy vector system (Promega, Madison, WI, USA, cat. no. A1360, store at −20 °C)
- DH5-α competent cells (Thermo Scientific, Waltham, MA, USA, cat. no. EC0112)
- LB medium (see Section 6)
- Culture media preparation (see Section 6)
- Ampicillin (Sigma-Aldrich, St. Louis, MO, USA, cat. no. A0166, store at −20 °C)
- IPTG (Fisher Scientific, Waltham, MA, USA, cat. no. BP1755-1, store at −20 °C)
- X-GAL (Sigma-Aldrich, St. Louis, MO, USA, cat. no. 7240-90-6, store at −20 °C)
- Plasmid mini-prep kit (Thermo Scientific, Waltham, MA, USA, cat. no. K0503)
- M13F and M13R vector primers (Integrated DNA Technologies, www.idtdna.com, (accessed on 9 March 2021)) (see Table S1 for primer sequences)
- DIG RNA labeling kit (SP6/T7) (Roche, Basel, Switzerland, cat. no. 11175025910, store at −20 °C)
- DNA gel-loading buffer (6X) (Thermo Fisher Scientific, Waltham, MA, USA, cat. no. R0611 store at 4 °C)
- Linear acrylamide (AMRESCO, Cleveland, OH, USA, cat. no. K548, store at 4 °C)
- Sodium acetate (Sigma-Aldrich, St. Louis, MO, USA, cat. no. 127-09-3)
- 100% Ethanol (DECON Laboratories Inc, King of Prussia, PA, USA, cat. no. 64-17-5)
- Hybridization buffer (see Section 6)
- PBS (see Section 6)
- Fixation buffer (see Section 6)
- Xylenes (Sigma-Aldrich, St. Louis, MO, USA, cat. no. 534056) CAUTION Harmful by inhalation and in contact with skin.
- Methanol (Sigma-Aldrich, St. Louis, MO, USA, cat. no. 38460) CAUTION Methanol is poisonous. It should not be inhaled, swallowed or be allowed to touch the skin.
- PBT (see Section 6)
- Proteinase K (Sigma-Aldrich, St. Louis, MO, USA, cat. no. P2308, store at −20 °C)
- Anti-digoxigenin-AP Fab fragment (Roche, Basel, Switzerland, cat. no. 11093274910, store at 4 °C)
- Staining buffer (see Section 6)
- Staining solution (see Section 6)
- NBT (Promega, Madison, WI, USA, cat. no. S380C, store at store at −20 °C) CAUTION Toxic.
- BCIP (Promega, Madison, WI, USA, cat. no. S381C, store at 4 °C) CAUTION Toxic.
- Trizma Base (Sigma-Aldrich, St. Louis, MO, USA, cat. no. T6066)
- Glacial acetic acid (Sigma-Aldrich, St. Louis, MO, USA, cat. no. 320099)
- EDTA (Sigma-Aldrich, St. Louis, MO, USA, cat. no. E0399)
- 37% HCl (Sigma-Aldrich, St. Louis, MO, USA, cat. no. 320099) CAUTION Toxic when inhaled, causes irritation to the respiratory tract, and causes skin burn.
- Tryptone (Sigma-Aldrich, St. Louis, MO, USA, cat. no. T7293)
- Yeast extract (Sigma-Aldrich, St. Louis, MO, USA, cat. no. Y1625)
- NaCl (Sigma-Aldrich, St. Louis, MO, USA, cat. no. S3014)
- NaOH (Sigma-Aldrich, St. Louis, MO, USA, cat. no. S5881) CAUTION Causes severe skin burns and eye damage.
- Agar (Sigma-Aldrich, St. Louis, MO, USA, cat. no. A6686)
- Formamide (Sigma-Aldrich, St. Louis, MO, USA, cat. no. 221198) CAUTION Suspected of causing cancer.
- Salmon sperm DNA (Invitrogen, Carlsbad, CA, USA, cat. no. 15632-011)
- Heparin sodium salt (Sigma-Aldrich, St. Louis, MO, USA, cat. no. H3393)
- Tween 20 (Sigma-Aldrich, St. Louis, MO, USA, cat. no. P1379)
- Triton X-100 (Sigma-Aldrich, St. Louis, MO, USA, cat. no. X100)
- K2HPO4 (Sigma-Aldrich, St. Louis, MO, USA, cat. no. P2222)
- KH2PO4 (Sigma-Aldrich, St. Louis, MO, USA, cat. no. P5655)
- Sodium citrate (Sigma-Aldrich, St. Louis, MO, USA, cat. no. S1804)
- Deoxycholic acid (Sigma-Aldrich, St. Louis, MO, USA, cat. no. D2510)
- 16% Paraformaldehyde (Electron Microscope Sciences, Hatfield, PA, USA, cat. no. 15710) CAUTION Causes skin and eye irritation. Suspected of causing genetic defects and may cause cancer.
- MgCl2 (Sigma-Aldrich, St. Louis, MO, USA, cat. no. M8266)
- Gel slick (Lonza, Basel, Switzerland, cat. no. 50640).
2.7. Equipment and Supplies
- Thermocycler (Eppendorf AG, Hamburg, Germany, cat. no. 6325)
- Incubator (Thermo Fisher Scientific, Waltham, MA, USA, cat. no. 6246)
- Centrifuge (Eppendorf AG, Hamburg, Germany, cat. no. 5424)
- Refrigerated centrifuge (Eppendorf AG, Hamburg, Germany, cat. no. 5404R)
- Water bath (Thermo Scientific, Waltham, MA, USA, cat. no. 1521038, model HAAKE S3)
- Incubator shaker (New Brunswick, Edison, NJ, USA, model I-SERIES 24)
- Vortex mixer (Labnet, www.labnetinternational.com, (accessed on 9 March 2021), cat. no. S0100, model VX100)
- Electrophoresis power supply (Fisher Scientific, Waltham, MA, USA, cat. no. FB1000)
- Dissecting scope (Olympus, www.olympus-lifescience.com, (accessed on 9 March 2021), cat. no. SZ51)
- Digital heating block (Apollo Instrumentation, city, state abbrev if USA, country)
- Stereo Microscope (Olympus, www.olympus-lifescience.com, (accessed on 9 March 2021), model SZX16)
- DP72 camera (Olympus, www.olympus-lifescience.com, (accessed on 9 March 2021), model U-TV1X-2)
- UVP Transilluminator (BioDoc-ItTM Imaging System, www.uvp.com, (accessed on 9 March 2021))
- Digital monochrome printer (Mitsubishi, www.uvp.com, (accessed on 9 March 2021), model P95DW)
- Pipettors (Fisherbrand, Waltham, MA, USA, cat. no. 14-388-100)
- Blunt forceps (Dumont #2) (Fisher Scientific, Waltham, MA, USA, cat. no. 50-822-406)
- Fine forceps (Dumont #5) (Fisher Scientific, Waltham, MA, USA, cat. no. 50-822-450)
- Surgical scissors (Fine Science Tools, www.finescience.com/en-US/, (accessed on 9 March 2021) cat. no. 91500-09)
- 1.5 mL Eppendorf tubes (Fisherbrand, Waltham, MA, USA, cat. no. 05-408-141)
- 2 mL Eppendorf tubes (Fisherbrand, Waltham, MA, USA, cat. no. 05-408-132)
- Falcon tubes (Fisher Scientific, Waltham, MA, USA, cat. no. 14-959-70C)
- 20 mL Scintillation vial (DWK Life Sciences, Wheaton, Millville, NJ, USA, cat. no. 74510-20)
- 20 mL glass centrifugation tube (Pyrex, city, Corning, NY, USA, cat. no. 9825)
- Glass-viewing dish (Pyrex spot plates 9 concave depressions 22 mm O.D. × 7 mm deep) (Fisher scientific, Waltham, MA, USA, cat. no. 13-748B)
- Medium-sized Petri dish (VWR, Cleveland, OH, USA, cat. no. 25384-302)
- Microscope slides 75 × 25 × 1 mm (VWR Vistavision, Cleveland, OH, USA, cat. no 16004-368)
- Permanent double-sided tape (Scotch, www.scotchbrand.com, (accessed on 9 March 2021) cat. no 38-8507-5367-3)
- Clean razor blade (VWR, Cleveland, OH, USA, cat. No. 55411-050)
- Medium-sized paintbrush (Liner 44,278 Plaid®Xuancheng, Xuancheng, China)
- Kleenex paper (Fisher Scientific, Waltham, MA, USA, cat. no. 06-666-11)
- Kimwipes® disposable wipers (Sigma Aldrich, St. Louis, MO, USA, cat. no. Z188964)
- Helicon Focus software (http://www.heliconsoft.com/heliconsoft-products/helicon-focus/ (accessed on 8 March 2021)).
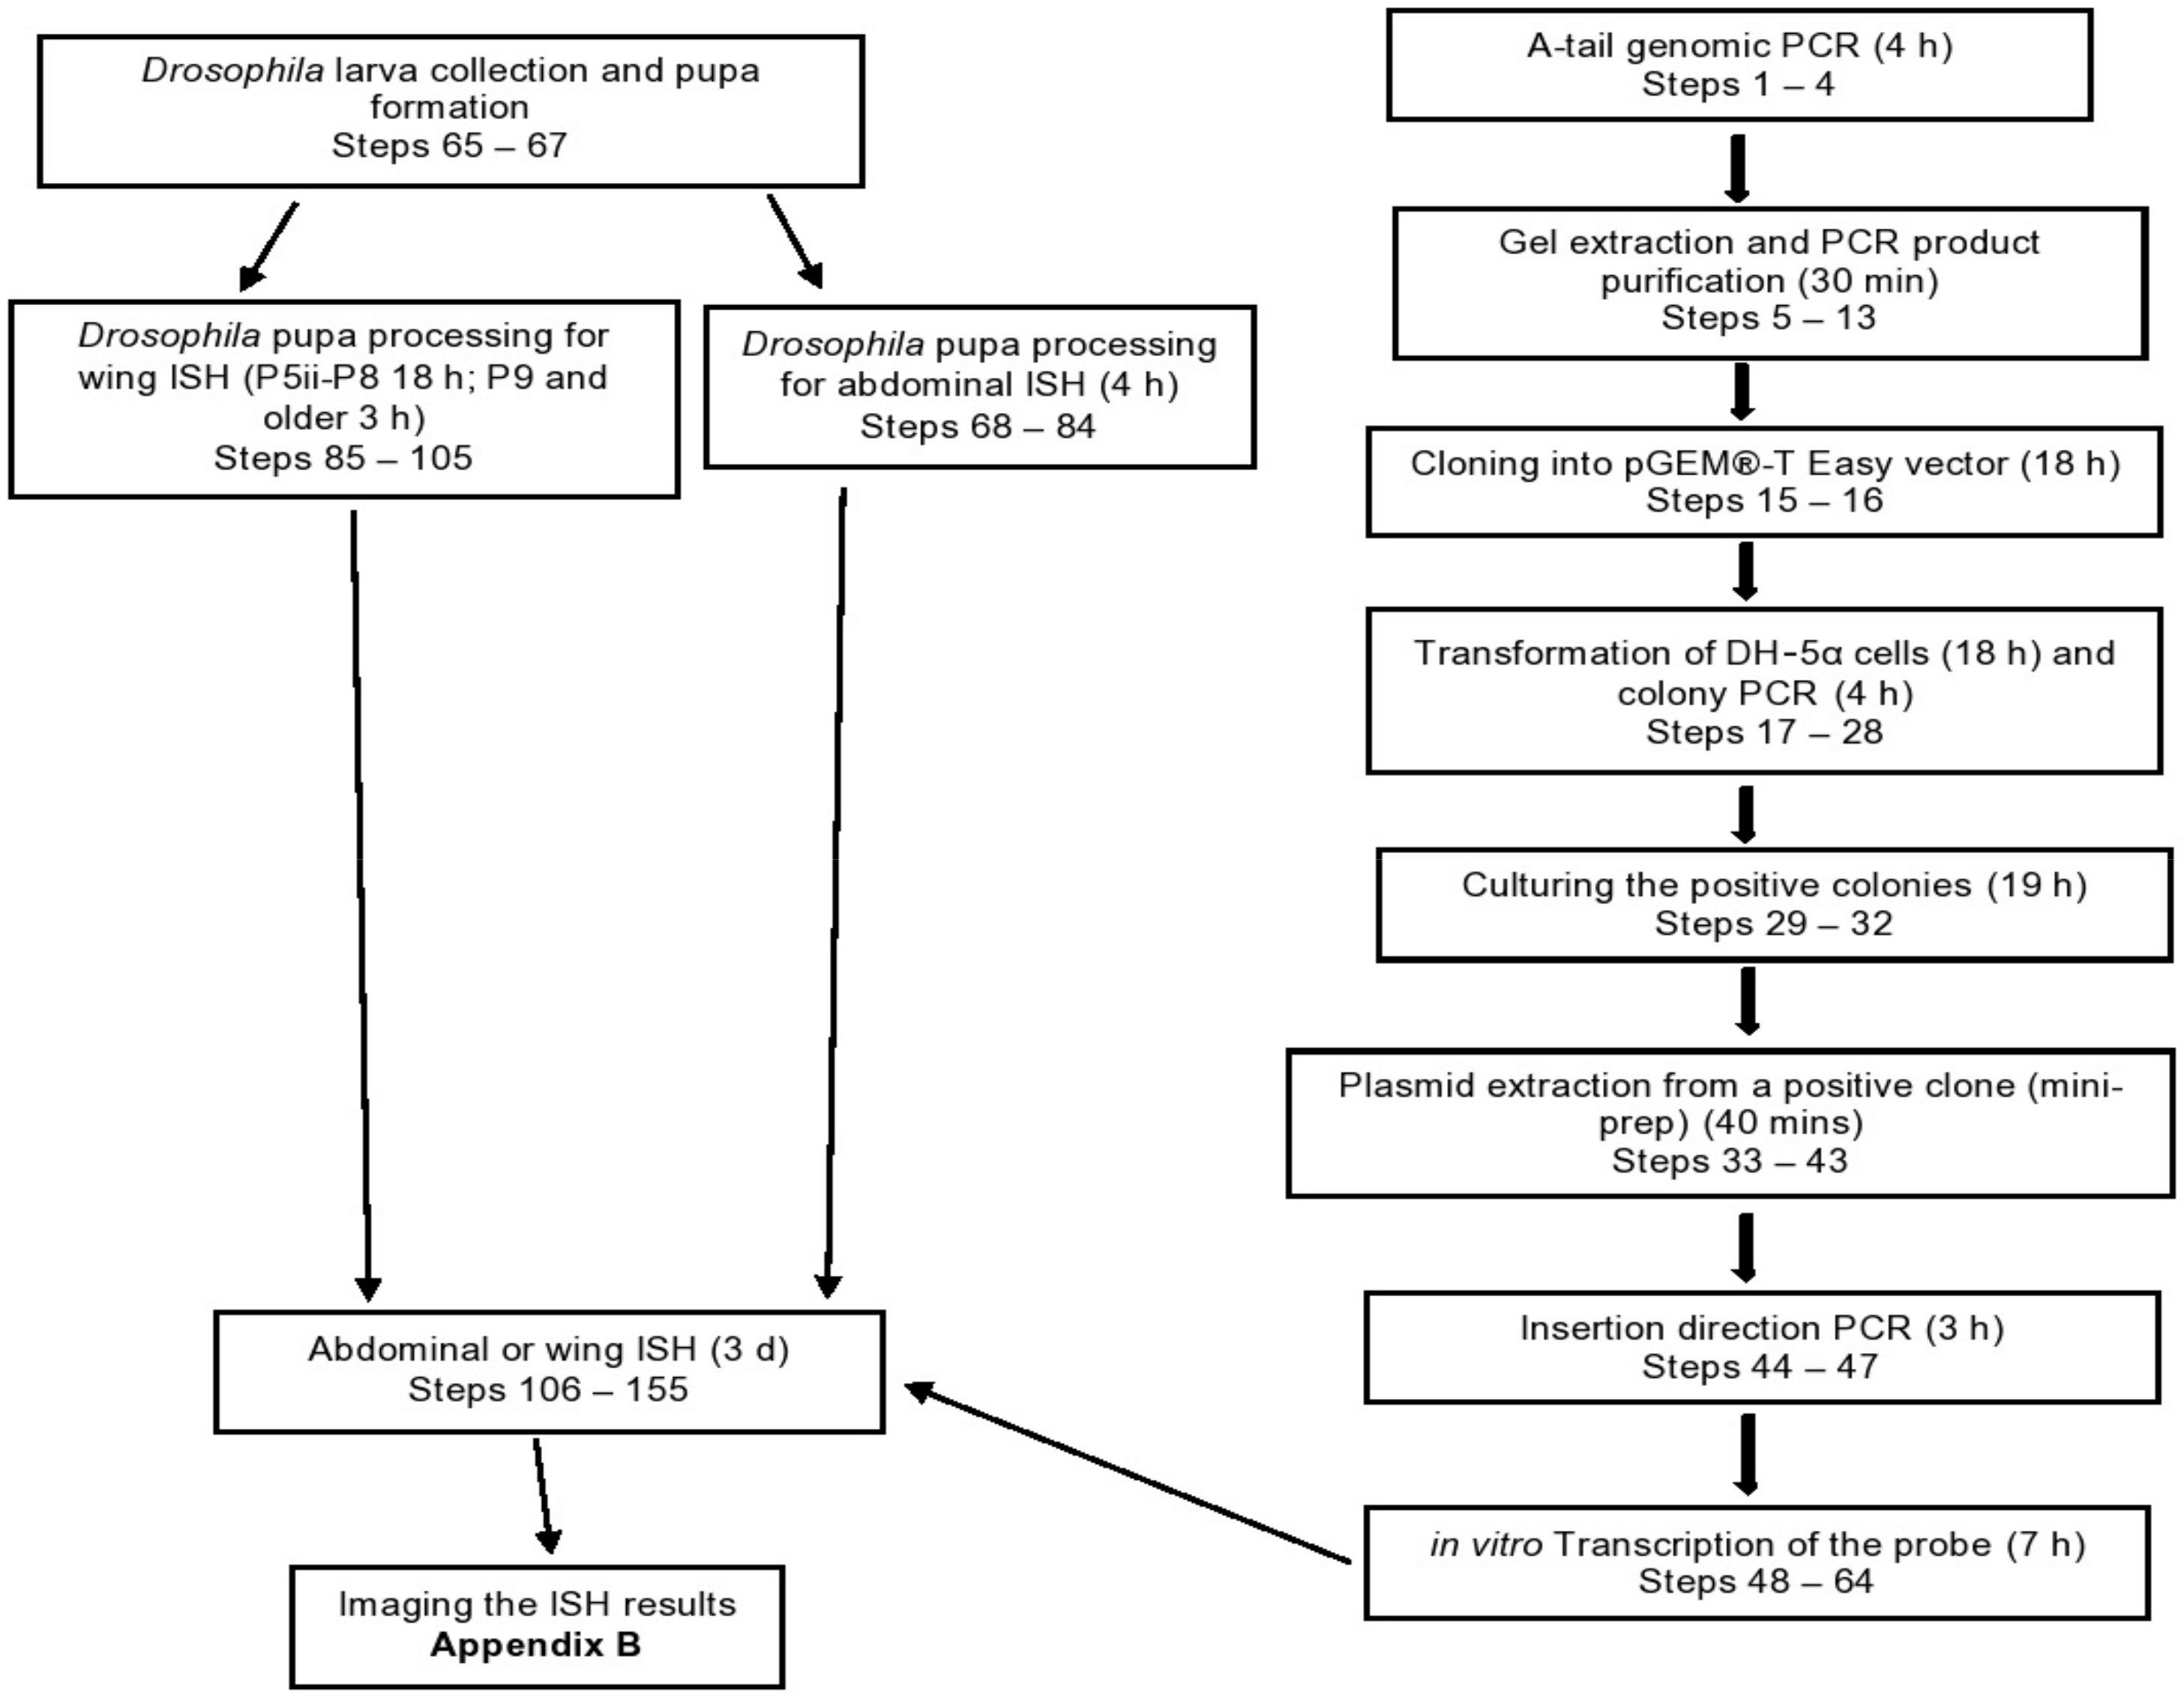
3. Procedure
3.1. A-Tail Genomic PCR
- (1)
- Prepare a reaction mix, according to the Table 1 below.
- (2)
- Amplify the PCR product according to the appropriate cycling conditions (Table 2).
- (3)
- Run the PCR product through a 1% (w/v) agarose gel in 1× TAE buffer by electrophoresis and visualize it under UV light.
- (4)
- If the size of the PCR product matches the expected size, perform a gel extraction.
3.2. Gel Extraction and Purification of PCR Products
- (5)
- On a table-top UV light, cut out the gel slice containing the DNA fragment, using a clean razor blade and place it into a 2 mL Eppendorf tube.
- (6)
- Add 1:1 volume of binding buffer to the gel slice (w/v).
- (7)
- Incubate at 60 °C until the gel slice is completely dissolved.
- (8)
- Transfer the solubilized gel solution to the purification column. Centrifuge for 1 min and discard the flow-through.
- (9)
- Add 700 µL of wash buffer to the column. Centrifuge for 1 min and discard the flow-through.
- (10)
- Centrifuge the empty column for 1 min to completely remove the wash buffer.
- (11)
- Transfer the column into a 1.5 mL Eppendorf tube. Add 30 µL of elution buffer and incubate at room temperature for 1 min.
- (12)
- Centrifuge for 1 min to collect the DNA fragment in the 1.5 mL tube.
- (13)
- Store the purified DNA at −20 °C.
 PAUSE STEP Purified PCR products can be stored at −20 °C for one month.
 CRITICAL STEP MeanGreen master mix adds A-tails to the PCR products. In case you use a PCR master mix that does not add A-tails, add the A-tails after per forming the gel extraction, according to the Table 3 below. Also, note that A-tails de-grade after one month of storage at −20 °C.
- (14)
- Incubate in a thermocycler at 72 °C for 45 min. Store at −20 °C.
3.3. Ligation
- (15)
- To ligate the A-tailed PCR product with the pGEM®-T Easy vector, use the reaction mix in the Table 4 below.
- (16)
- Incubate the ligation reaction at 4 °C overnight.
CRITICAL STEP The pGEM®-T Easy vector features T-overhangs essential for T/A cloning of an A-tailed DNA fragment. Also, this vector contains the SP6/T7 promoters, which will later flank the insert after an additional PCR reaction.3.4. Transformation of DH5-α Cells and Colony PCR
- (17)
- Add 2 µL of the raw ligation product to 50 µL of E. coli DH5-α competent cells in a 1.5 mL Eppendorf tube.
- (18)
- Place the tube on ice for 45 min.
- (19)
- Heat shock the mixture at 42 °C for 1 min in a water bath.
- (20)
- Immediately transfer the tube back to the ice and leave it for 5 min.
- (21)
- Add 200 µL of LB medium to the cells.
- (22)
- Incubate the culture at 37 °C in an incubator shaker for 1 h at 200 r.p.m.
- (23)
- Prepare an ampicillin agar (200 µg/mL) in a medium-sized culture medium plate (see Section 6). The plate should be pre-made at least a day before use and stored at 4 °C.
- (24)
- Mix 100 µL of the IPTG and 50 µL of the X-Gal solutions and spread them evenly on the bacterial agar plate for the blue/white colony selection.
- (25)
- Add 50–100 µL of the bacterial culture (step 22) onto the agar plate.
- (26)
- Incubate the plate at 37 °C for 18 h.
- (27)
- Pick 12 white colonies with a small pipette tip (use fresh pipette tips to pick each colony) and suspend each bacterial colony in 10 µL of dH2O in 1.5 mL Eppendorf tubes. The white colonies should contain inserts, while the blue colonies likely contain empty, self-ligated vector.
- (28)
3.5. Culturing the Positive Colonies
- (29)
- Mix 6 µL of ampicillin (2 mg/mL) with 3 mL LB medium in a sterile glass tube.
- (30)
- Inoculate the tube with 5 µL of the bacterial colony suspension (Step 27).
- (31)
- Mix thoroughly.
- (32)
- Incubate at 37 °C in an incubator shaker for 18 h at 200 r.p.m.
3.6. Plasmid Extraction from a Positive Clone (Mini-Prep) Using the Plasmid Mini-Prep Kit by Thermo Scientific
- (33)
- Pour ~1.8 mL of the cultured cells (containing the cloned plasmid) into a 2-mL Eppendorf tube.
- (34)
- Centrifuge at 15,000× g for 30 s at room temperature and discard the supernatant.
- (35)
- Add 250 µL of the resuspension buffer and vortex to resuspend the cell pellet.
- (36)
- Add 250 µL of the lysis buffer and mix by inverting the tube 10 times.
- (37)
- Add 350 µL of the neutralization buffer and mix by inverting the tube 10 times.
- (38)
- Centrifuge for 5 min at 15,000× g at room temperature.
- (39)
- Pour the supernatant into the spin column and centrifuge for 1 min at 15,000× g at room temperature.
- (40)
- Add 500 µL of the wash buffer to the spin column. Centrifuge for 1 min at 15,000× g at room temperature and discard the flow-through. Repeat this step.
- (41)
- Transfer the spin column into a clean 1.5-mL Eppendorf tube.
- (42)
- Add 30 µL of the Elution buffer to elute the plasmid DNA. Incubate for 2 min at room temperature and centrifuge for 2 min at 15,000× g at room temperature.
- (43)
- Store the mini-prep DNA (containing the cloned-plasmid) at −20 °C.
PAUSE STEP The DNA can be stored at −20 °C indefinitely.3.7. Insertion Direction PCR
- (44)
- Carry out the insertion direction PCR for each mini-prep DNA to determine the orientation of the insert in the pGEM®-TEasy vector to choose the correct RNA polymerase that will synthesize an antisense probe, according to Table 7.
- (45)
- Set up two PCR reactions simultaneously for each DNA clone, using the following primer pairs: (i) the M13F primer plus the gene-specific internal forward primer; and (ii) the M13F primer plus the gene-specific internal reverse primer.
- (46)
- Perform the PCR reactions according to the cycling conditions described in (Table 8).
- (47)
- Perform gel electrophoresis of the PCR products, using a 1% (w/v) agarose gel in 1× TAE and visualize the bands under UV light.
CRITICAL STEP If the primer pair M13F/internal reverse shows a PCR band, use Sp6 polymerase to make an anti-sense probe. However, if the primer pair M13F/internal forward shows a PCR band, use T7 polymerase to make an anti-sense probe. Only one of the primer pairs should produce a clear PCR band.3.8. RNA Probe Synthesis
- (48)
- PCR-amplify the cloned insert, using the mini-prep DNA as a template (Step 43). Use the M13F and M13R primer pair, as tabulated below (Table 9).
- (49)
- Amplify according to the cycling conditions described in Table 8.
- (50)
- Run the electrophoresis of the PCR product, using a 1% (w/v) agarose gel in 1× TAE.
- (51)
- Extract the DNA band and elute it in 30 µL Elution buffer, as described in Steps 5–13.
- (52)
- Measure the DNA concentration.
CRITICAL STEP For a high probe yield, use 0.05–0.1 µg/µL of the DNA as a template for the in vitro transcription reaction.- (53)
- Prepare the anti-sense RNA probe reaction mix as tabulated below (Table 10).
- (54)
- Incubate at 37 °C for 2 h.
CRITICAL STEP Remember to use the correct RNA polymerase based on the insertion direction PCR result (Steps 44–47). (Recall: If the primer pair M13F/internal reverse shows a PCR band, use Sp6 polymerase to make an anti-sense probe. However, if the primer pair M13F/internal forward shows a PCR band, use T7 polymerase to make an anti-sense probe).3.9. RNA Probe Quality Check and Precipitation
- (55)
- Check the quality of the synthesized RNA probe by running 1 µL of the newly synthesized probe (Step 54) alongside 1 µL of the purified PCR (Step 51) on a gel.
- (56)
- Add 2 µL of the gel loading buffer into 9 µL of H20, then add 1 µL of the probe.
- (57)
- Vortex, then briefly spin down.
- (58)
- Load the 12 µL on a 1% agarose gel and perform electrophoresis in 1× TAE buffer. An example of a gel image showing a successfully transcribed probe is shown in (Figure 3).
- (59)
- Precipitate the remaining 9 µL of the synthesized probe as shown below (Table 11).
- (60)
- Incubate at −20 °C for 20 min.
- (61)
- Spin at 15,000 r.p.m at 4 °C for 30 min.
- (62)
- Pipette off the supernatant and discard.
- (63)
- Air-dry the probe-containing pellet for 5 min.
- (64)
- Dissolve the pellet in 50–100 µL of the pre-hybridization buffer on ice by carefully pipetting the liquid up and down.
CRITICAL STEP Depending on the probe yield, use 100 µL of pre-hybridization solution to dissolve the pellet when you see a solid probe band on the gel or use 50 µL if the band is rather faint.PAUSE STEP The RNA probe can be stored aliquoted for about two years at −20 °C (create a stock and several aliquots).3.10. Drosophila Pupa Collection and Processing for Abdominal ISH
CRITICAL STEP The following instructions are critical for Steps 65–154: (1) Look through the dissecting scope during all pipetting steps. (2) Washes are with 1 mL of organic solutions for 5 min, and 10 min for aqueous solutions, unless otherwise indicated. (3) Washes involving hybridization solution are 500 µL. (4) Do not agitate the samples too much during washes; only gently move the liquid in and out of the pipette when removing liquid. (5) After washes, remove waste from the wells of the glass-viewing dish in 150 µL increments and with the same 200 µL tip. (6) Successive washes are done under a running clock.- (65)
- Collect wandering third-instar (L3) larvae from the Drosophila culture bottle and place them in a Petri dish with moist Kleenex paper on the bottom.
- (66)
- Store the Petri dish in a species-specific moist chamber so that different species are not mixed, and the moist chamber prevents the larvae from drying out.
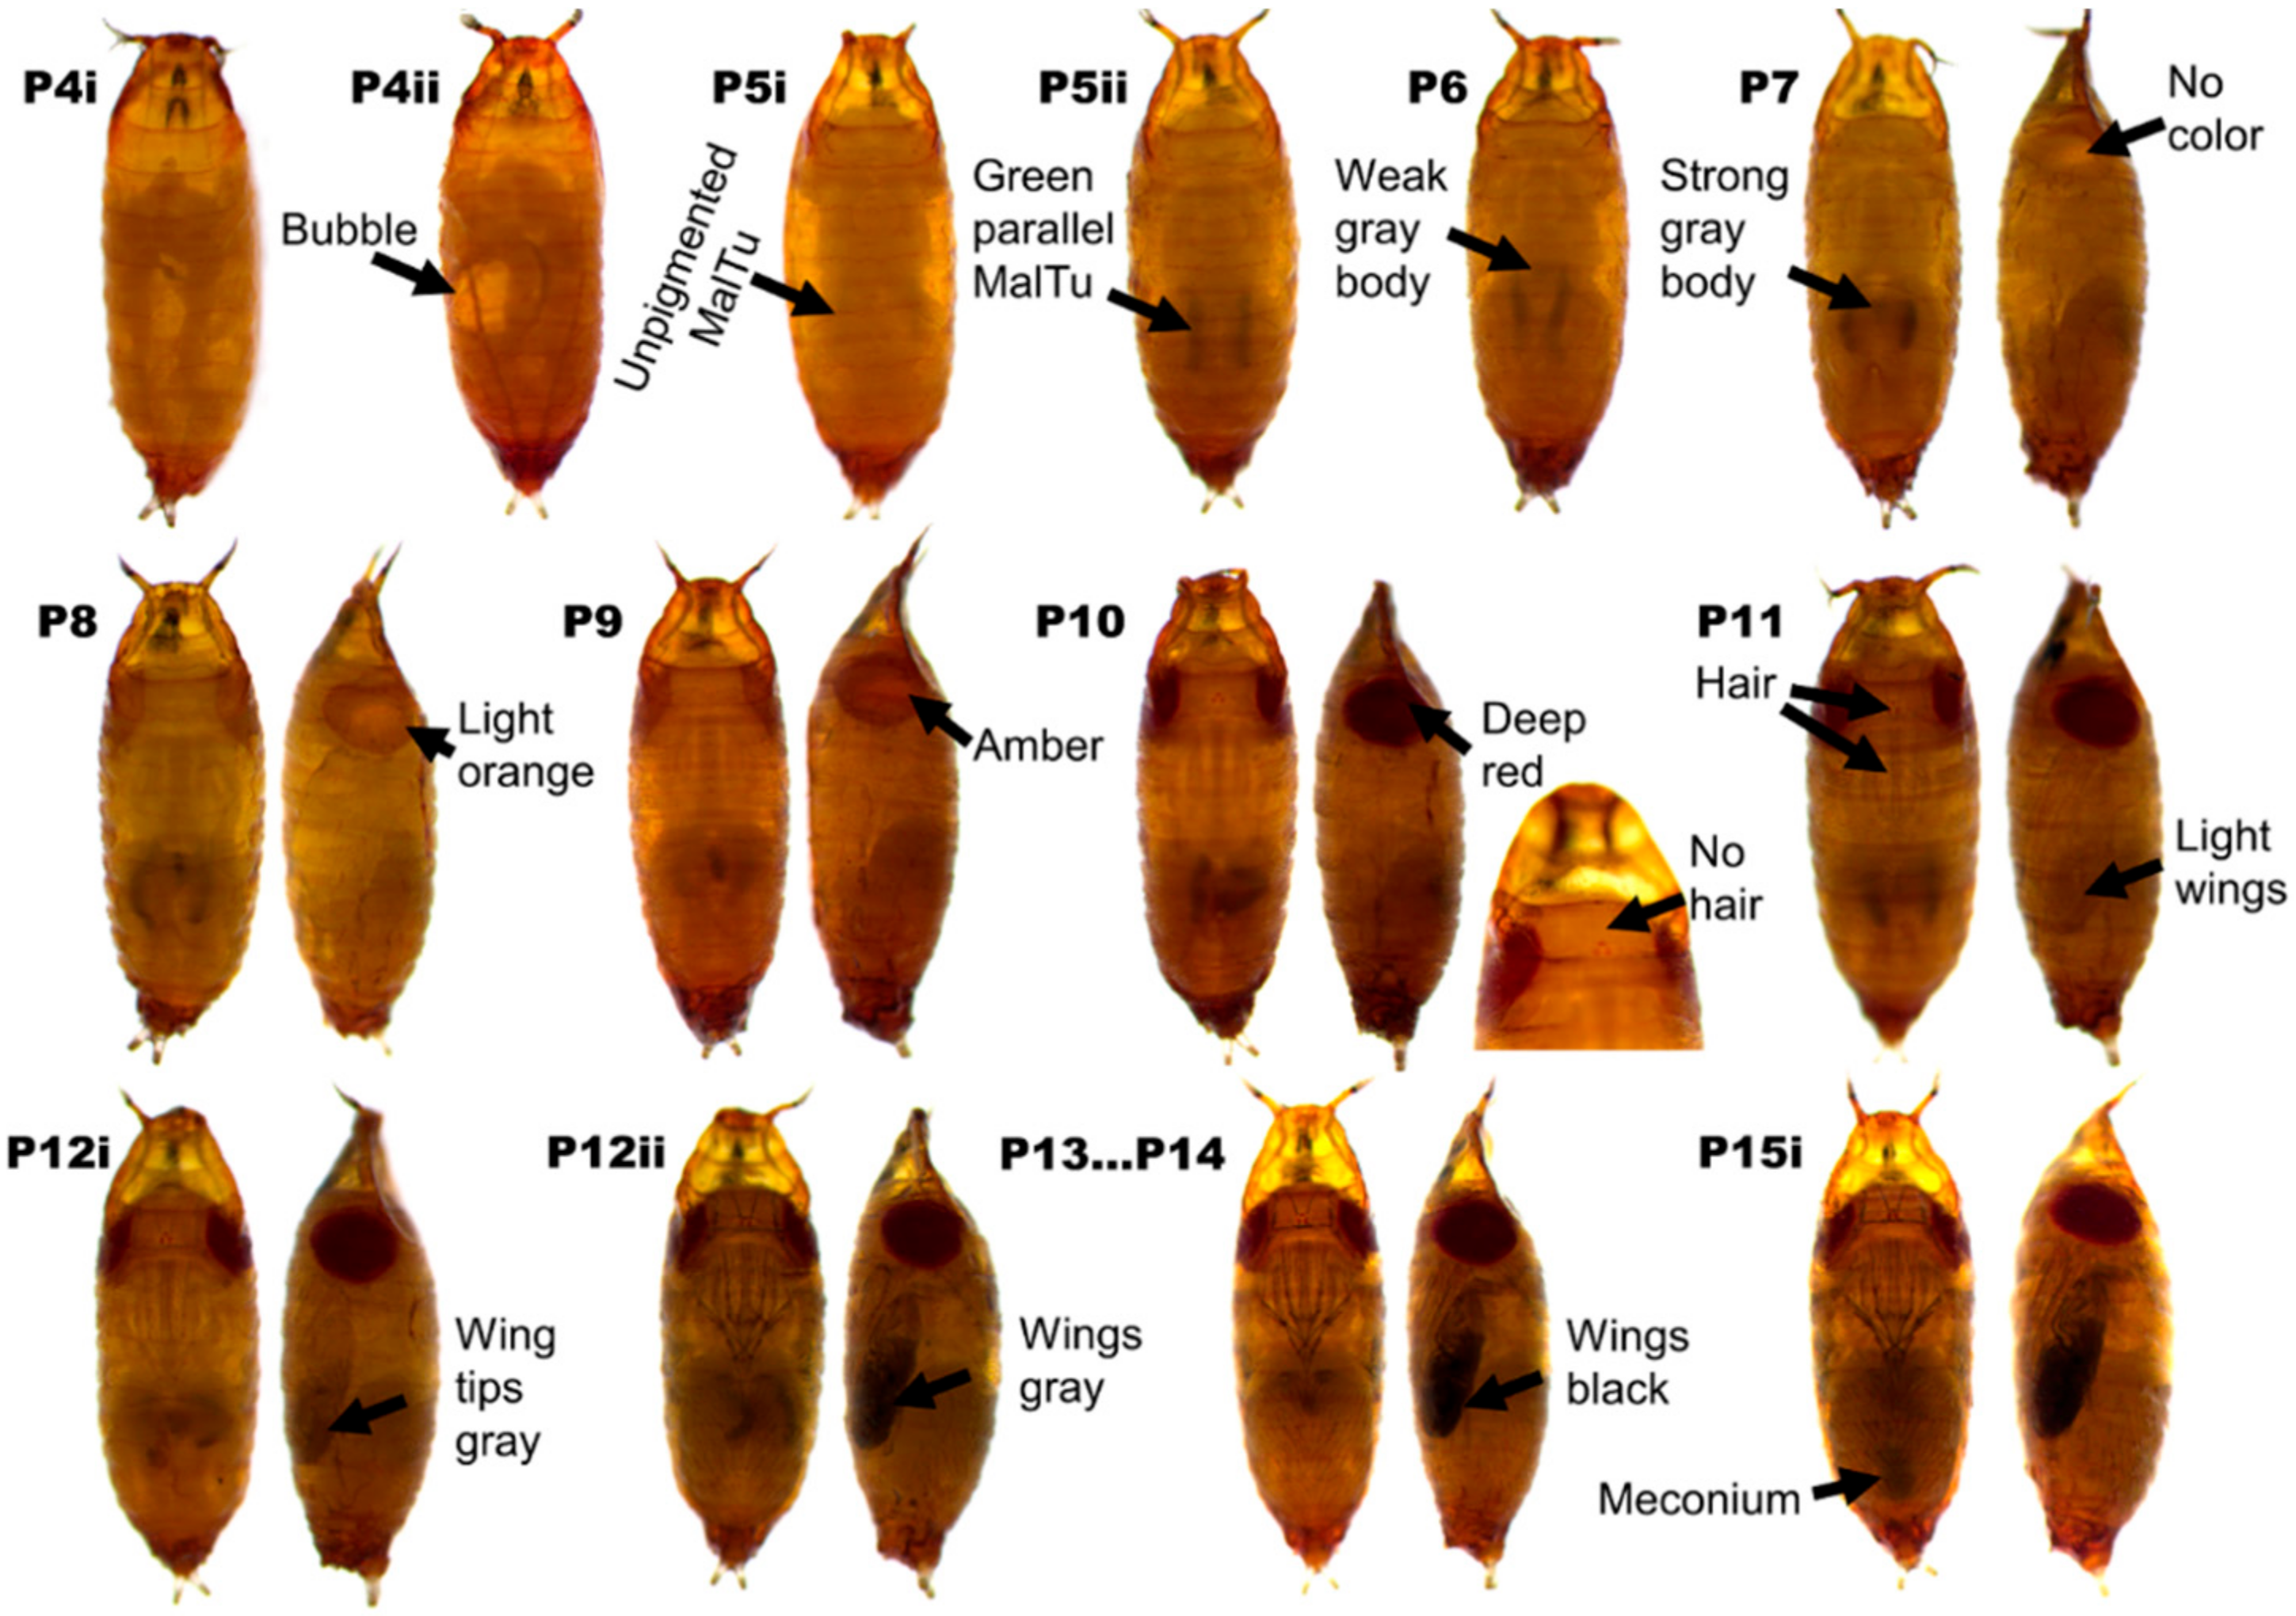
- (67)
- Wait until the pupae are at the desired stage (Figure 2).
- (68)
- Use a dissecting scope set to 20× magnification to clearly see the key features of the pupal stages.
- (69)
- Prepare a glass slide with a piece of double-sided tape on it (dissection platform).
- (70)
- Fill the well of a glass-viewing dish with 1 mL of freshly prepared 1× PBS.
- (71)
- Use blunt forceps (type #2) to gently remove the pupae from the Petri dish (one at a time) and immediately transfer them onto the dissection platform.
- (72)
- Lay the pupae with their ventral side facing the tape and cut longitudinally between both eyes (dorsal cut) or lay them on their lateral side and cut longitudinally through the pupae, separating the dorsal from the ventral half (lateral cut) (Figure S1). Perform only one type of cut in a session.
- (73)
- With a razor blade, immediately cut each pupa lengthwise (starting with the one first placed on the tape). This is best accomplished with a single rapid cut from the anterior to the posterior end of the pupae. Ensure that the puparium is intact after cutting.
- (74)
- Using a medium-sized paintbrush, transfer a small amount of 1× PBS from the glass-viewing dish to each cut pupa to dissolve them from the tape.
- (75)
- Transfer the pupal halves with the brush into the well of a glass-viewing dish filled with 1× PBS.
CRITICAL STEP Dissect 10 pupae within 2 min and then transfer them into 1× PBS immediately. Label each end of the razor blade and use each end to dissect 50–60 pupae, after which the blade is too blunt and should be discarded.- (76)
- With a pair of surgical (sharp-pointed) forceps (type #5), grasp an individual pupa half anteriorly (by the head) and gently wash away the internal organs with 1× PBS.
- (77)
- Use a pipettor to gently flush 1× PBS over the internal organs without touching the epithelial layer of the pupa with the pipette tip (Figure S2). Prevent the epidermal tissue from becoming detached from the puparium at this time, as the puparium provides mechanical protection throughout the process.
CRITICAL STEP You must ensure to keep the epithelial cell layer intact throughout the washing steps. Therefore, apply low pressure from the pipettor by setting a 20-µL pipettor to 8.5 µL for pupal stages P7, P8 or to 15 µL for pupal stage P9. For stages P10 and older, use a 200-µL pipettor set to 25 µL. Too much pressure or excessive washing will lead to the loss of epithelial cells.- (78)
- Immediately transfer the washed pupa halves into a well with 1× PBS.
- (79)
- Remove the 1× PBS solution from the well.
- (80)
- Add 1 mL of the fixation buffer for abdominal ISH (Section 6) to the pupa halves.
- (81)
- Incubate at room temperature for 1 h.
- (82)
- Rinse the fixed pupae 3 times with 1× PBS.
- (83)
- The fixed samples may be used to perform ISH immediately (jump to Step 109) or stored for later use. If storage is the goal, dehydrate the pupa halves through a dilution series of 1× PBS:100% ethanol (3:1, 1:1, 1:3) for 20 min in each solution at room temperature.
- (84)
- Rinse once and wash once in 1 mL 100% ethanol. With a cut 1 mL tip, transfer the pupae into a 2-mL Eppendorf tube and store in 100% ethanol at −20 °C.
PAUSE STEP The processed pupae can be stored at −20 °C for 1 year.3.11. Drosophila Pupa Processing for Wing ISH
- (85)
- Collect wandering larvae in a Petri dish with a wet tissue paper on the bottom.
- (86)
- Check the time when most puparia have formed and collect P5ii–P8 pupae.
- (87)
- Place a 15-mL and a 50-mL Falcon tube with 1× PBS on ice.
- (88)
- Ensure the glass-viewing dish is coated with gel slick.
- (89)
- In a glass-viewing dish, put a batch of 5 pupae into 1× PBS and take them by the head out of their puparium. The heads may get destroyed, which is fine.
- (90)
- Cut off the heads and the tip of the abdomens without squeezing the body (avoid liquid getting pushed into the wings). Then, hold the pupae by the thorax and use a 200 µL pipette to carefully suck and blow out the guts through the open abdomen.
- (91)
- Collect the empty carcasses in a 2-mL Eppendorf tube filled with 1.5 mL of fixation buffer on ice.
- (92)
- Clean out the glass-viewing dish with distilled water and proceed with the next batch of 5 pupae.
- (93)
- Fix overnight at 4 °C. On the next morning, place the tube with the fixed carcasses on ice.
- (94)
- Pipette about 5 carcasses into a glass-viewing dish and remove the pupal membrane from the wings.
- (95)
- Carefully rip off the wings with a small piece of thorax still attached and collect them in a scintillation vial containing about 4 mL of methanol at room temperature.
- (96)
- After all wings are dissected, pipette them all back into the clean glass-viewing dish and wait additional 5 min.
- (97)
- Wash 2× with methanol.
- (98)
- Wash 2× with 100% ethanol.
- (99)
- Store the wings in 100% ethanol at −20 °C.
- (100)
- Cut pupal wings in dH2O at room temperature in a glass-viewing dish coated with gel slick.
- (101)
- Allow the wings to inflate.
- (102)
- Place the wings in 1.5 mL of fixation on ice in a 2-mL Eppendorf tube for 30 min.
- (103)
- Wash 2× with methanol.
- (104)
- Wash 2× with 100% ethanol.
- (105)
- Store the wings at −20 °C in 100% ethanol.
3.12. ISH of Drosophila Abdomens and Wings
- (106)
- Take the processed wings and the pupa halves from the −20 °C freezer.
- (107)
- Transfer the pupa halves with a pipette and a cut 1-mL tip into a glass-viewing dish.
- (108)
- Transfer the wings with a pipette and a cut 200-µL tip into a glass-viewing dish. Ensure that the glass-viewing dish is gel slick coated (Appendix C).
- (109)
- Wash once with 100% ethanol.
- (110)
- Incubate for 30 min with 1mL 1:1 xylenes:ethanol (v/v) in a fume hood.
- (111)
- Rinse once and wash 5× with 100% ethanol.
- (112)
- Wash 2× with methanol (wings only).
- (113)
- Rehydrate the tissues through a dilution series of 1× PBS:100% ethanol (1:3, 1:1, 3:1) (v/v) and incubate at room temperature for 20 min in each solution (skip this step for wing ISH).
- (114)
- Rinse once and wash 3× with PBT.
- (115)
- Perform a second fixation of the tissues for 30 min in 1 mL of fixation buffer at room temperature. Note that the fixation buffers for wing and abdomen ISH are different; therefore, see Section 6 for fixation buffer preparation.
- (116)
- Rinse once and wash 5× with PBT.
- (117)
- Replace the last PBT wash with 1 mL of the Proteinase K solution.
CRITICAL STEP Freshly prepare the Proteinase K solution on ice and use it within the same hour or two. For abdominal ISH, dilute 1 µL of Proteinase K stock [10 mg/mL in PBS] in 99 µL of PBT. Take 4 µL of this dilution and add it to 1 mL of PBT. For wing ISH, mix 0.4 µL of Proteinase K [10 mg/mL in PBS] with 1 mL of PBT.- (118)
- Incubate the tissues at room temperature for 10 min.
CRITICAL STEP Incubate the wings and abdomens in Proteinase K for 10 min for pupal stages P6 to P10 and 20 min for P11 to P15 to increase the tissue permeability and reduce background staining.- (119)
- Rinse 2× with PBT.
- (120)
- Wash 2× with PBT.
- (121)
- Post-fix the tissues for 30 min in 1 mL of fixation buffer at room temperature.
- (122)
- Wash 5× with PBT.
- (123)
- Wash in 1:1 PBT:hybridization solution (v/v).
- (124)
- Wash 3× with hybridization solution at room temperature.
- (125)
- Pipette the tissues into a 2 mL Eppendorf tube with a cut 1 mL tip.
- (126)
- Set the heating block to 80 °C.
- (127)
- Prehybridize the tissues in 500 µL of the hybridization solution and incubate at 65 °C for 1 h.
- (128)
- Dilute the probe (1:500) by adding 1 µL of the probe to 500 µL of hybridization solution in a 2 mL Eppendorf tube.
- (129)
- Incubate the diluted probe for 5 min in the heating block at 80 °C.
- (130)
- Immediately put the probe on ice to prevent secondary RNA structure formation.
- (131)
- Remove as much of the hybridization solution in (Step 127) without damaging the tissues and replace with the diluted probe on ice.
- (132)
- Incubate at 65 °C for >18 h to a maximum of 3 d, and gently swirl every couple of hours (not necessary during the night).
- (133)
- Pre-heat 3 mL of hybridization solution per sample to 65 °C on a dry-heating block.
- (134)
- Transfer the samples back into a clean glass-viewing dish by pipetting, using a cut 1-mL tip for abdomens and a cut 200-µL tip for wings.
- (135)
- Rinse once with pre-heated hybridization solution.
- (136)
- Incubate in pre-heated hybridization solution at 65 °C for 1 h.
- (137)
- Wash 3× at 65 °C for 30 min in pre-heated hybridization solution.
- (138)
- Prepare 1.5 mL of 1:1 PBT:hybridization solution (v/v).
- (139)
- Wash 2× with 1:1 PBT: hybridization solution (v/v) at room temperature.
- (140)
- Wash 5× with PBT.
- (141)
- Pipette the tissues with the 5th PBT wash into a 2 mL Eppendorf tube, using a cut 1-mL tip for abdomens or a cut 200-µL tip for wings.
- (142)
- Remove most of the PBT (leave about 50 µL PBT in the tube) and place the tissues on ice.
- (143)
- On ice in a separate 2-mL Eppendorf tube, add 0.2 µL of the Roche α-DIG AP Fab fragments to 1200 µL of PBT to result in a 1:6000 dilution.
- (144)
- Add 300 µL of the 1:6000 diluted Roche α-DIG-AP Fab fragments to each sample and incubate at 4 °C overnight.
- (145)
- Transfer the samples back into a clean glass-viewing dish by pipetting, using a cut 1-mL tip for abdomens and a cut 200-µL tip for wings.
- (146)
- Wash 5× with PBT at room temperature.
- (147)
- Wash 3× with staining buffer at room temperature (see Section 6).
- (148)
- Remove the epidermal tissue layer from the puparium (outer tan shell). This step is required for abdominal ISH only.
- (149)
- Prepare the staining solution: add 2.8 µL of NBT (50 mg/mL) and 1.4 µL of BCIP (50 mg/mL) to 400 µL of staining buffer. Mix and keep in the dark.
- (150)
- Replace the last wash with 400 µL of staining solution.
- (151)
- Incubate in the dark at room temperature.
- (152)
- Check for signal development (purple stain) every 20 min.
- (153)
- Stop staining after the expression patterns look good, rinse once, and wash 2× with staining buffer.
- (154)
- Rinse once and wash 2× with PBT.
- (155)
- The tissues are now ready to be imaged. Use the information in (Appendix B) to image the tissues.
3.13. Timing
- Steps 1–4, A-tail genomic PCR: 4 h
- Steps 5–13, Gel extraction and PCR product purification: 30 min
- Steps 15–16, Ligation: 18 h (overnight)
- Steps 17–28, Transformation of DH5-α cells and colony PCR: 24 h (overnight)
- Steps 29–32, Culturing the positive colonies: 18 h (overnight)
- Steps 33–43, Plasmid extraction from a positive clone (mini-prep): 40 min
- Steps 44–47, Insertion direction PCR: 3 h
- Steps 48–54, RNA probe synthesis: 5 h
- Steps 55–64, RNA probe quality check and precipitation: 2 h
- Steps 65–84, Drosophila pupa collection and processing: 4 h (This excludes the time for larva collection and the periods of pupal development)
- Steps 85–105, Drosophila pupa processing for wing ISH: 4 h
- Steps 106–155, Drosophila abdominal or wing ISH: 3 d
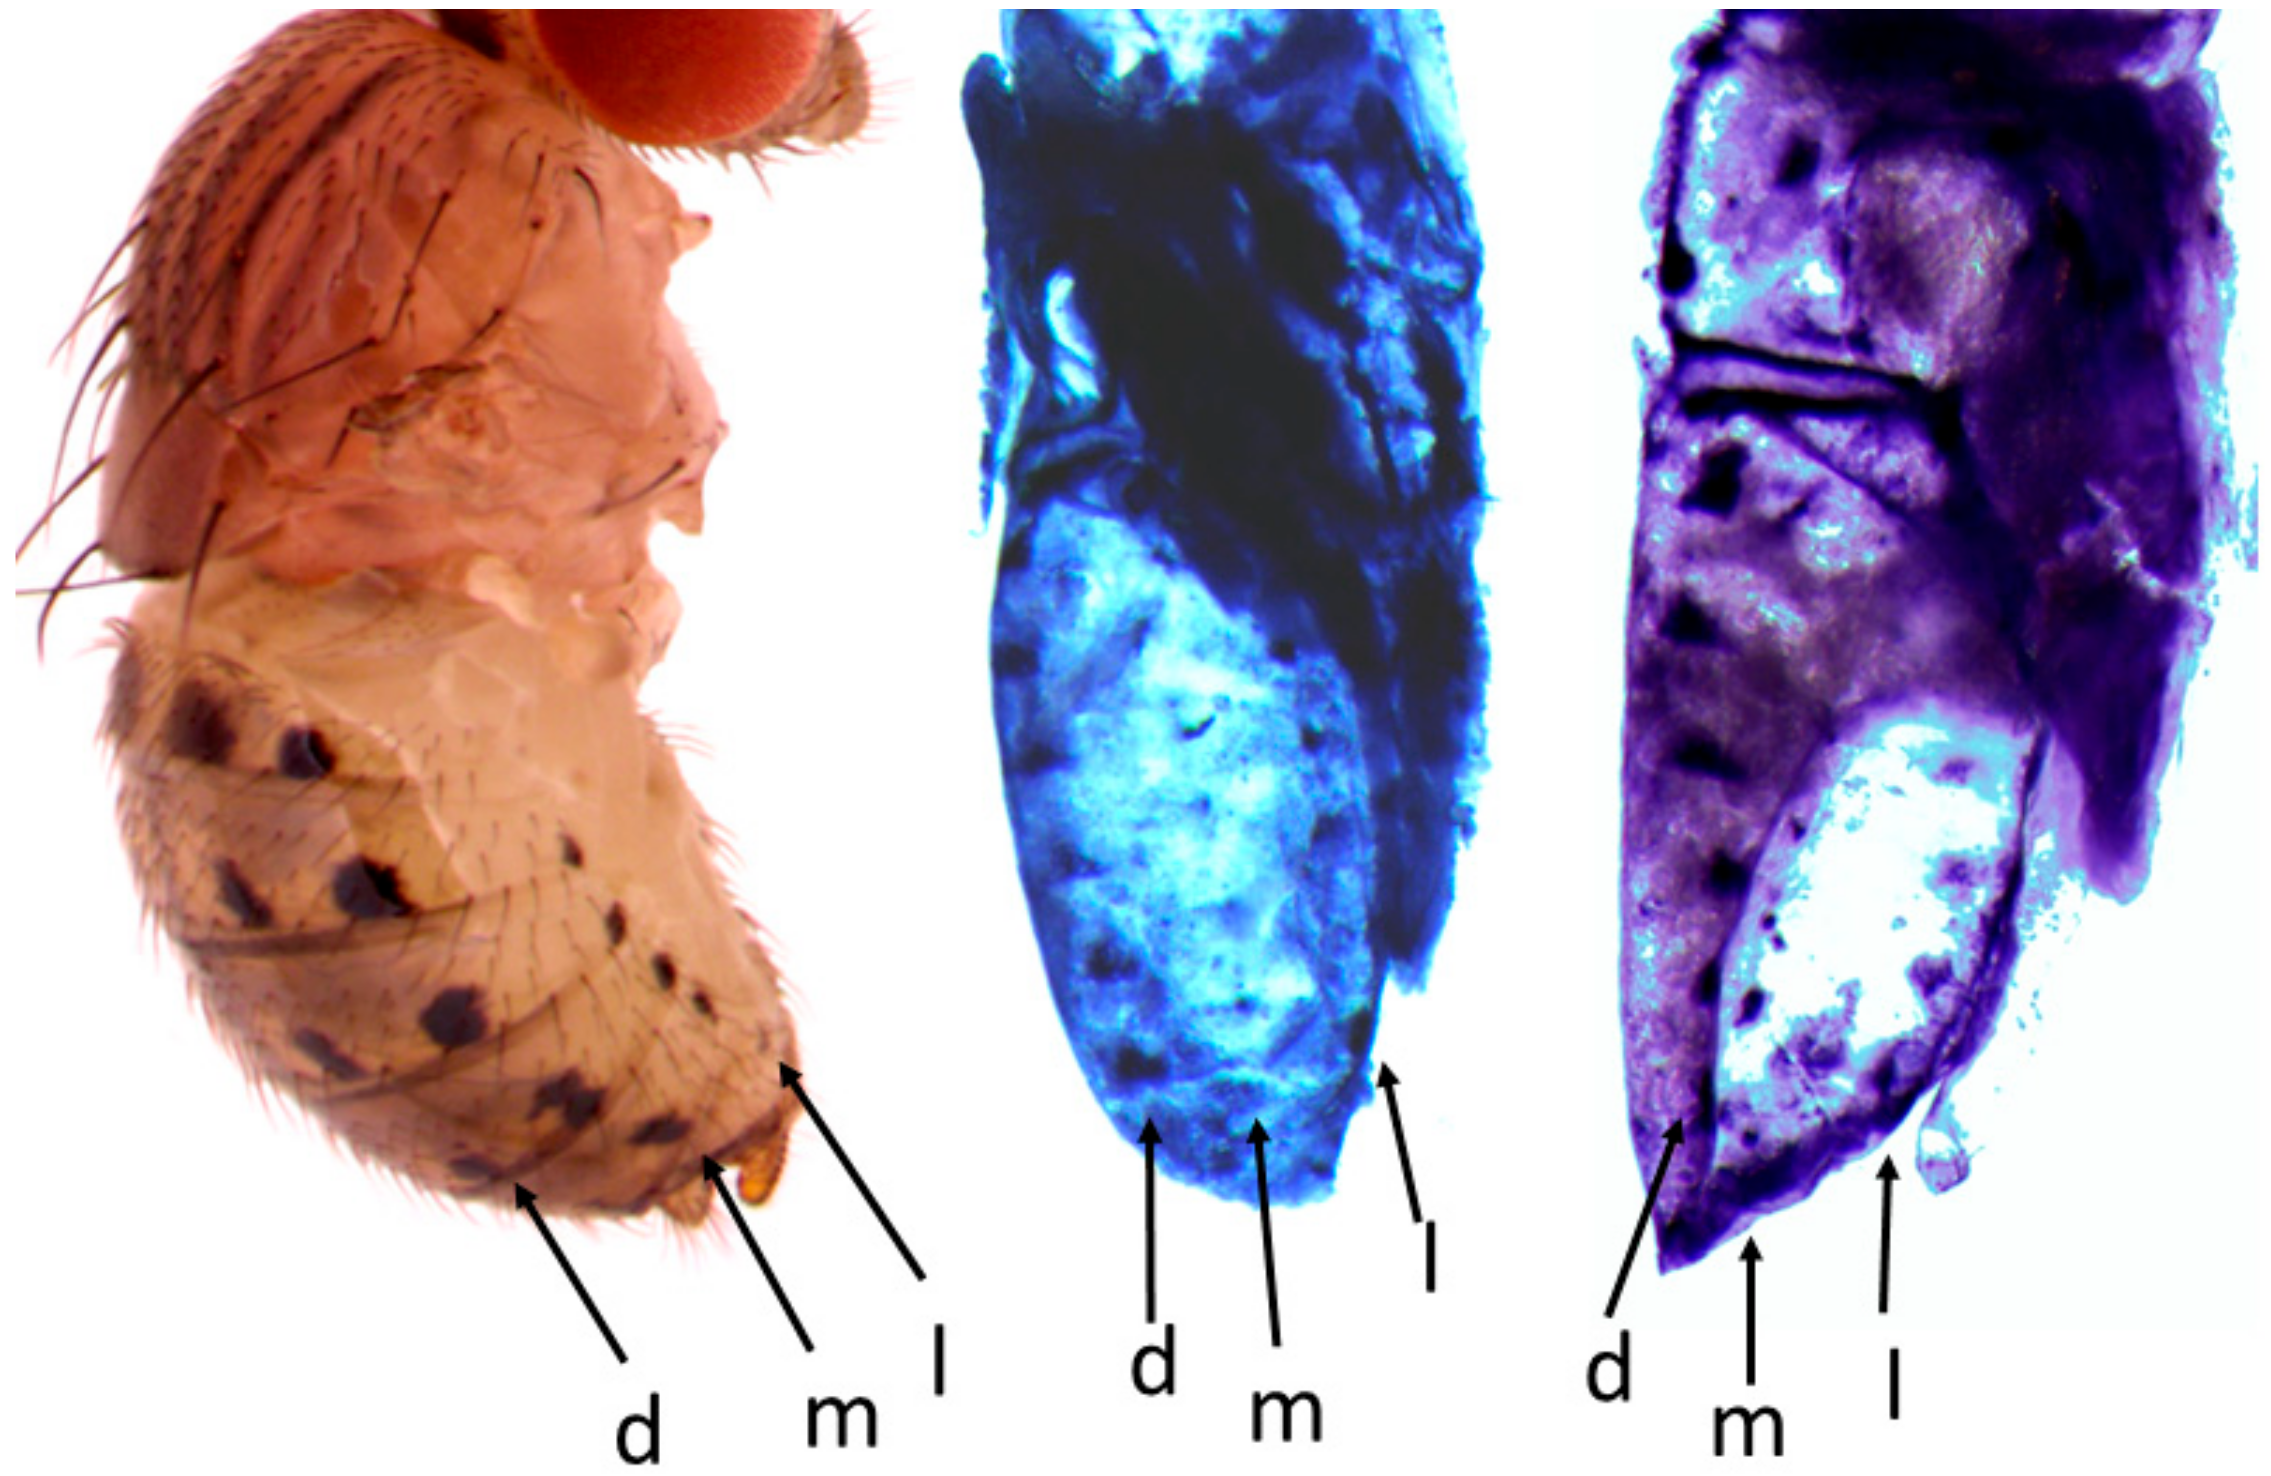
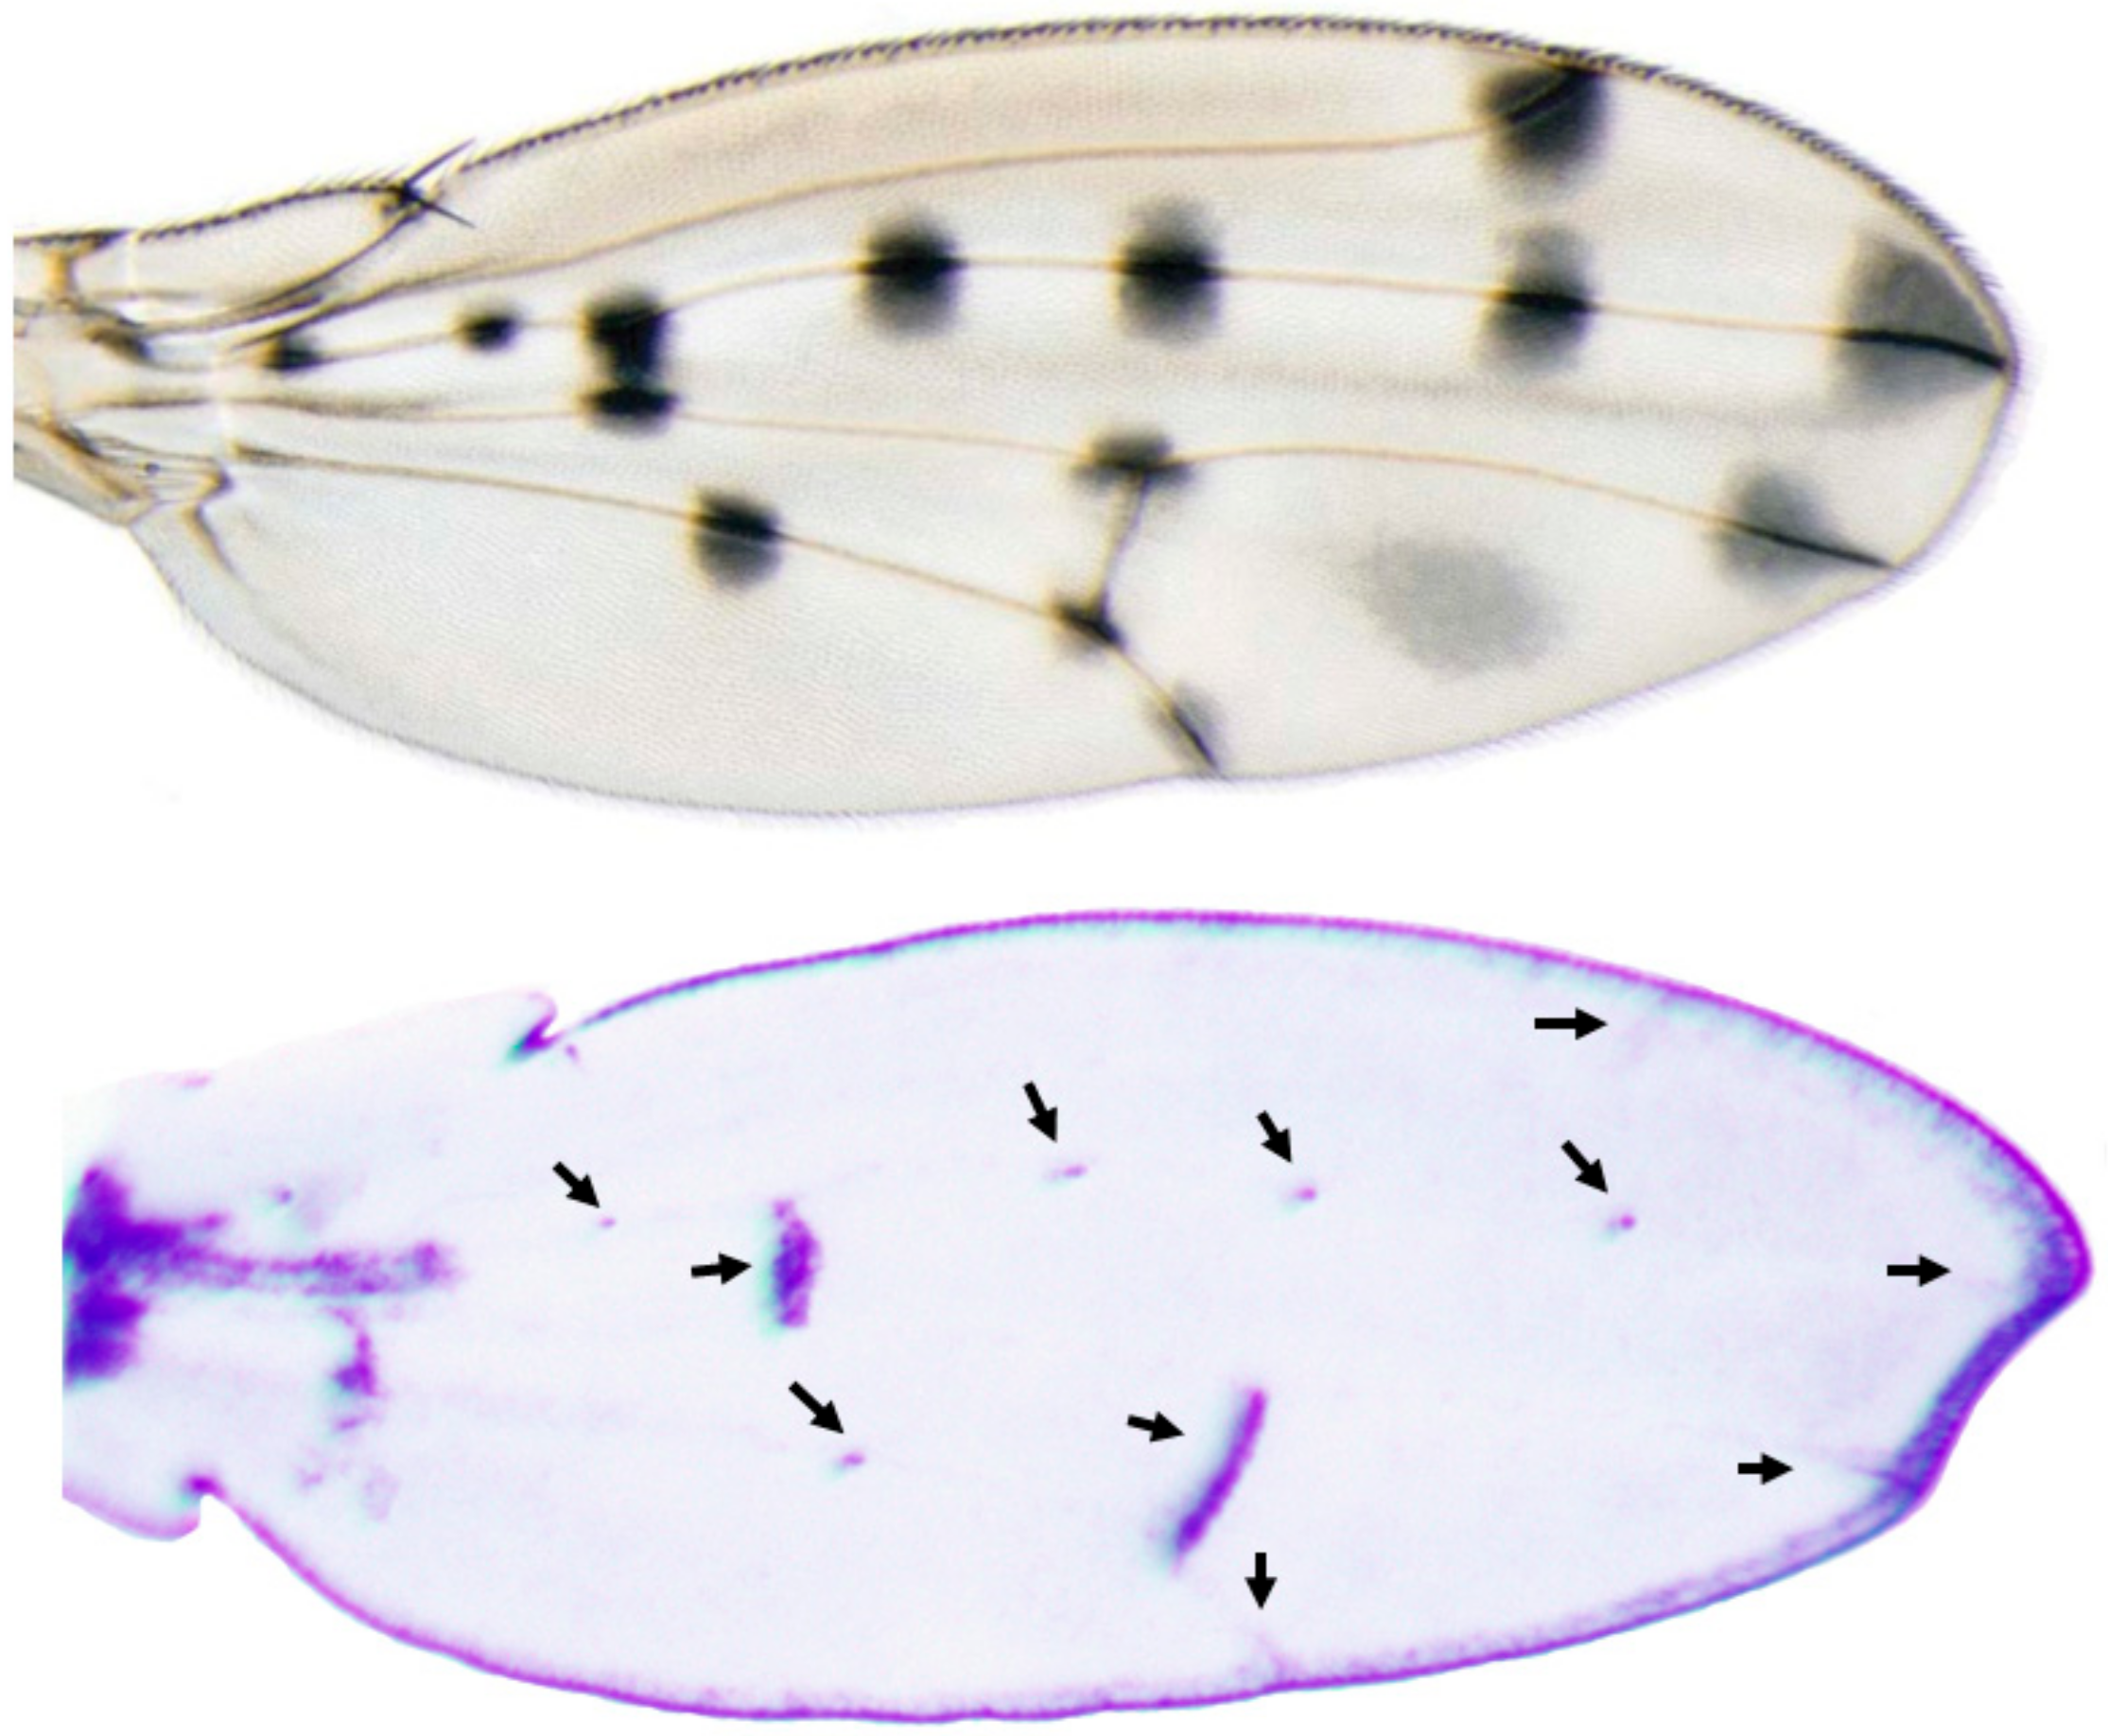
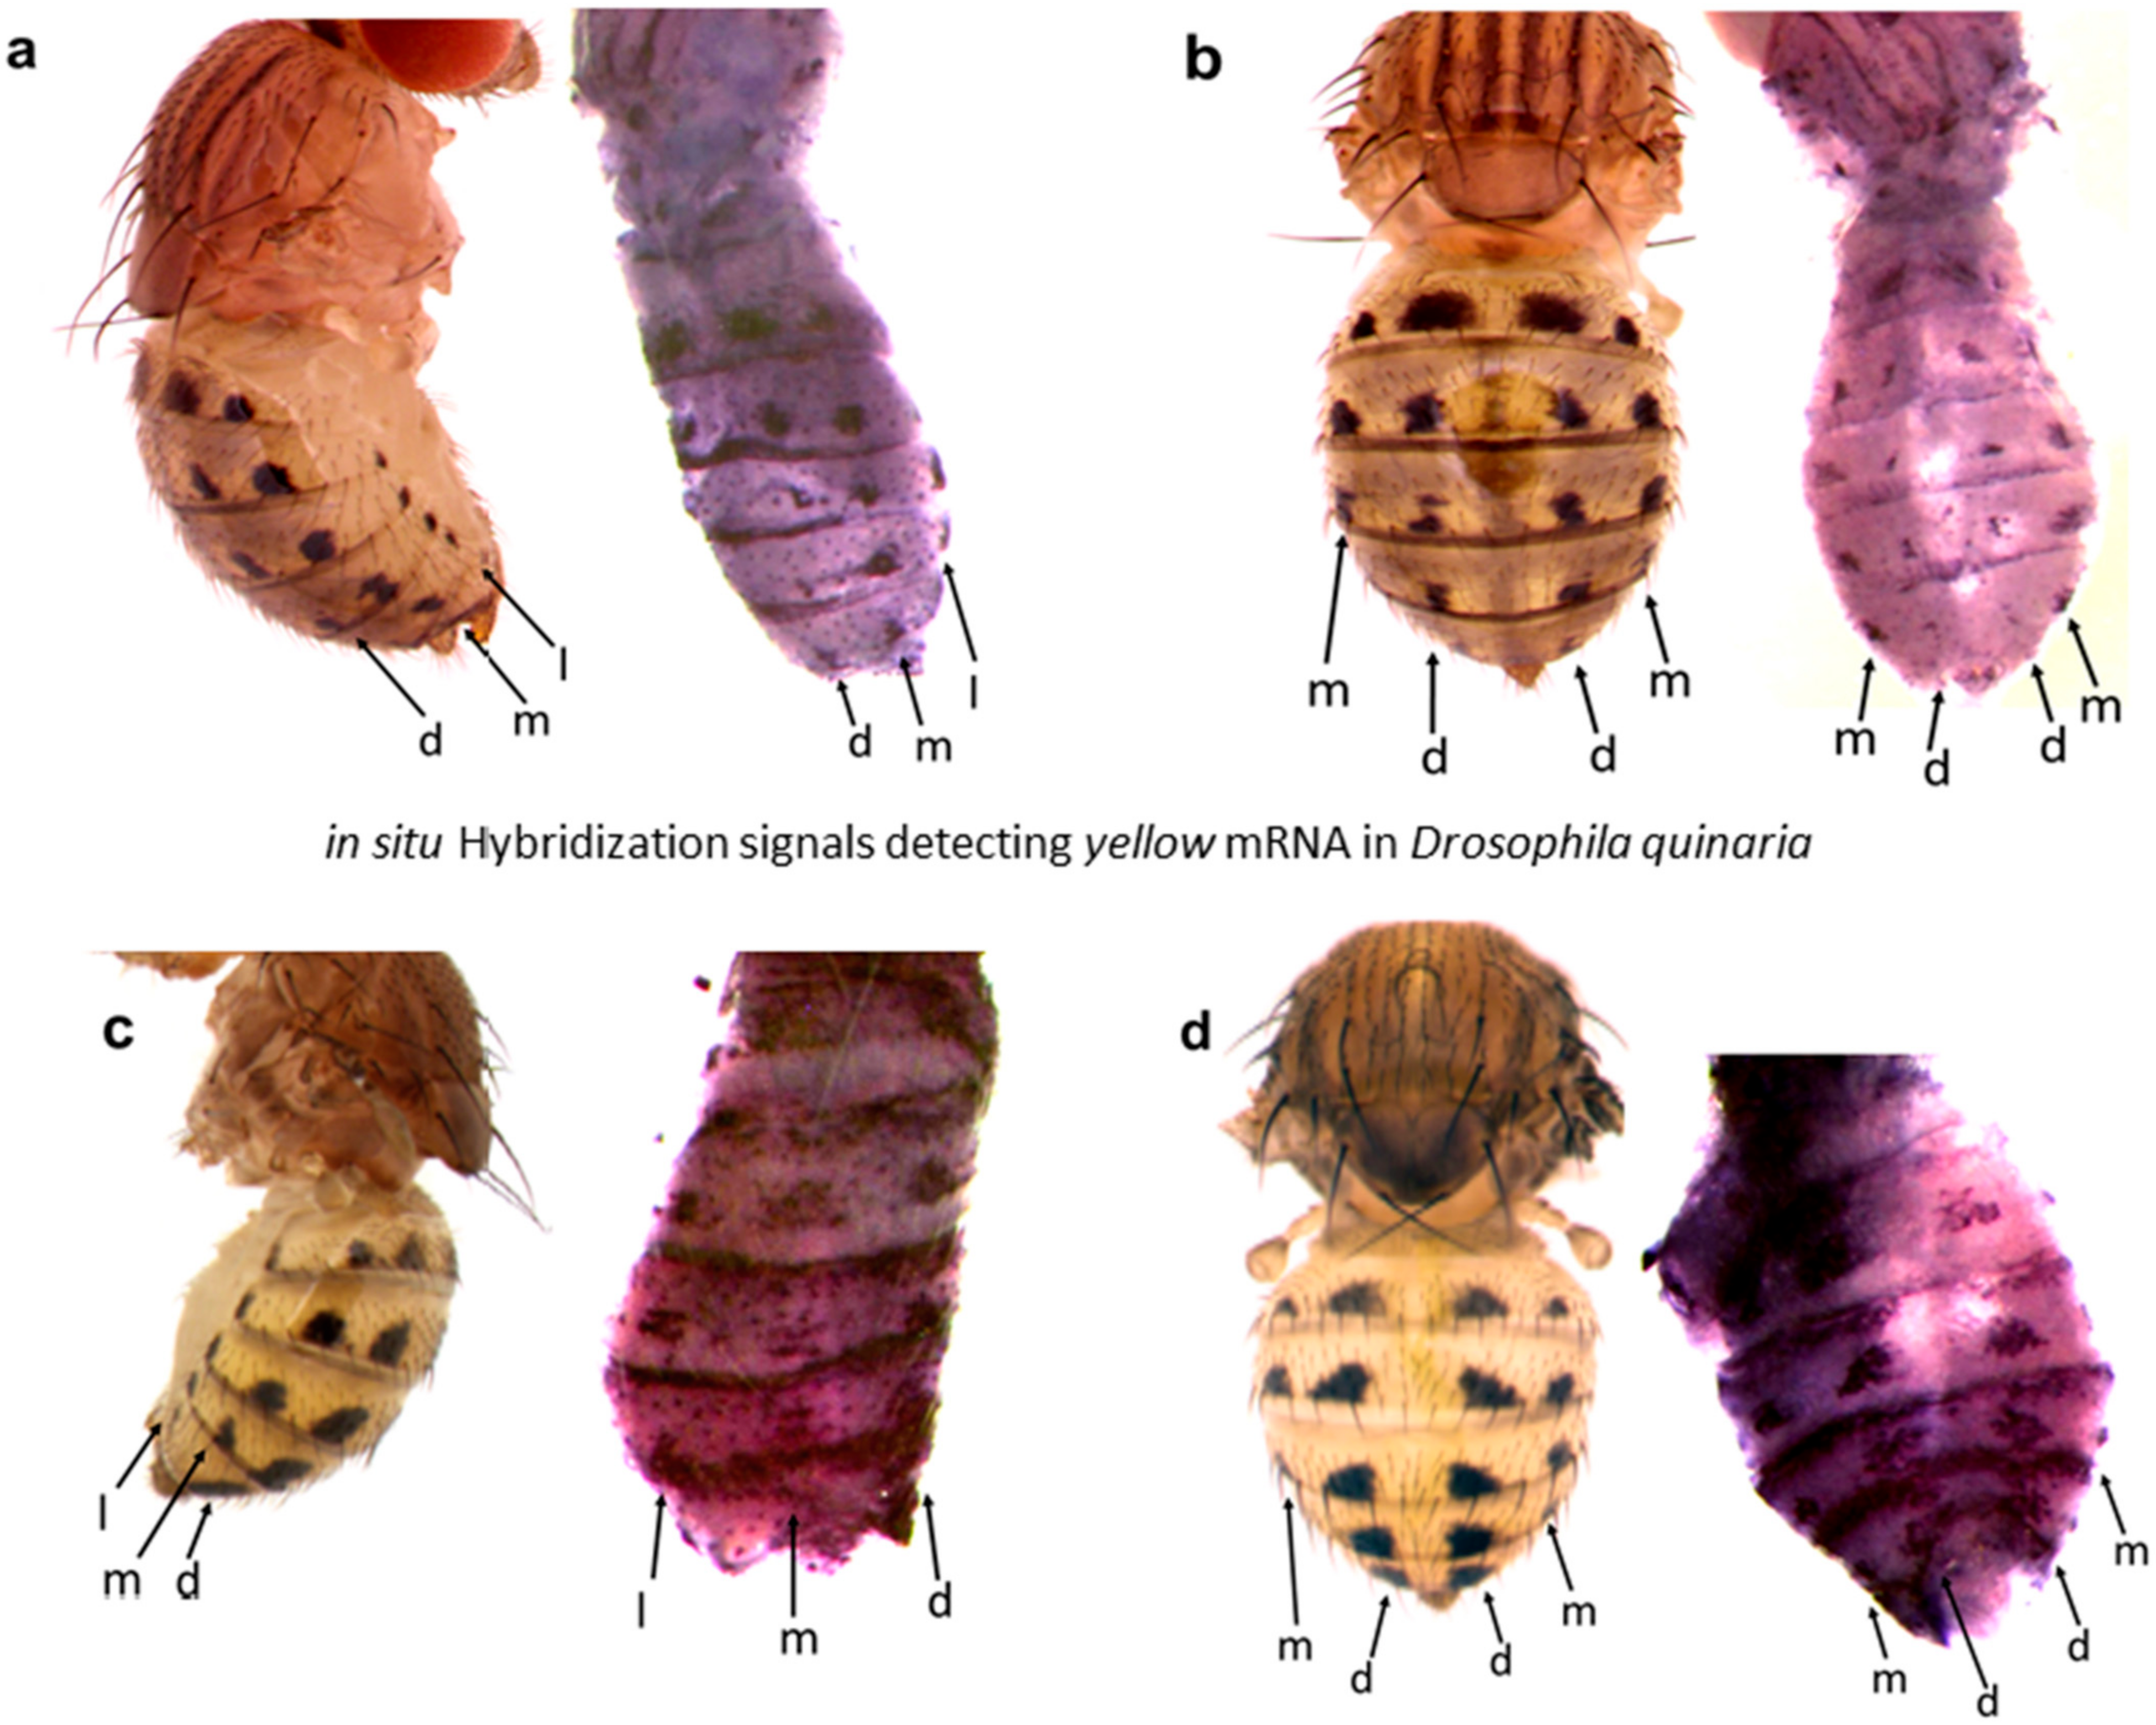
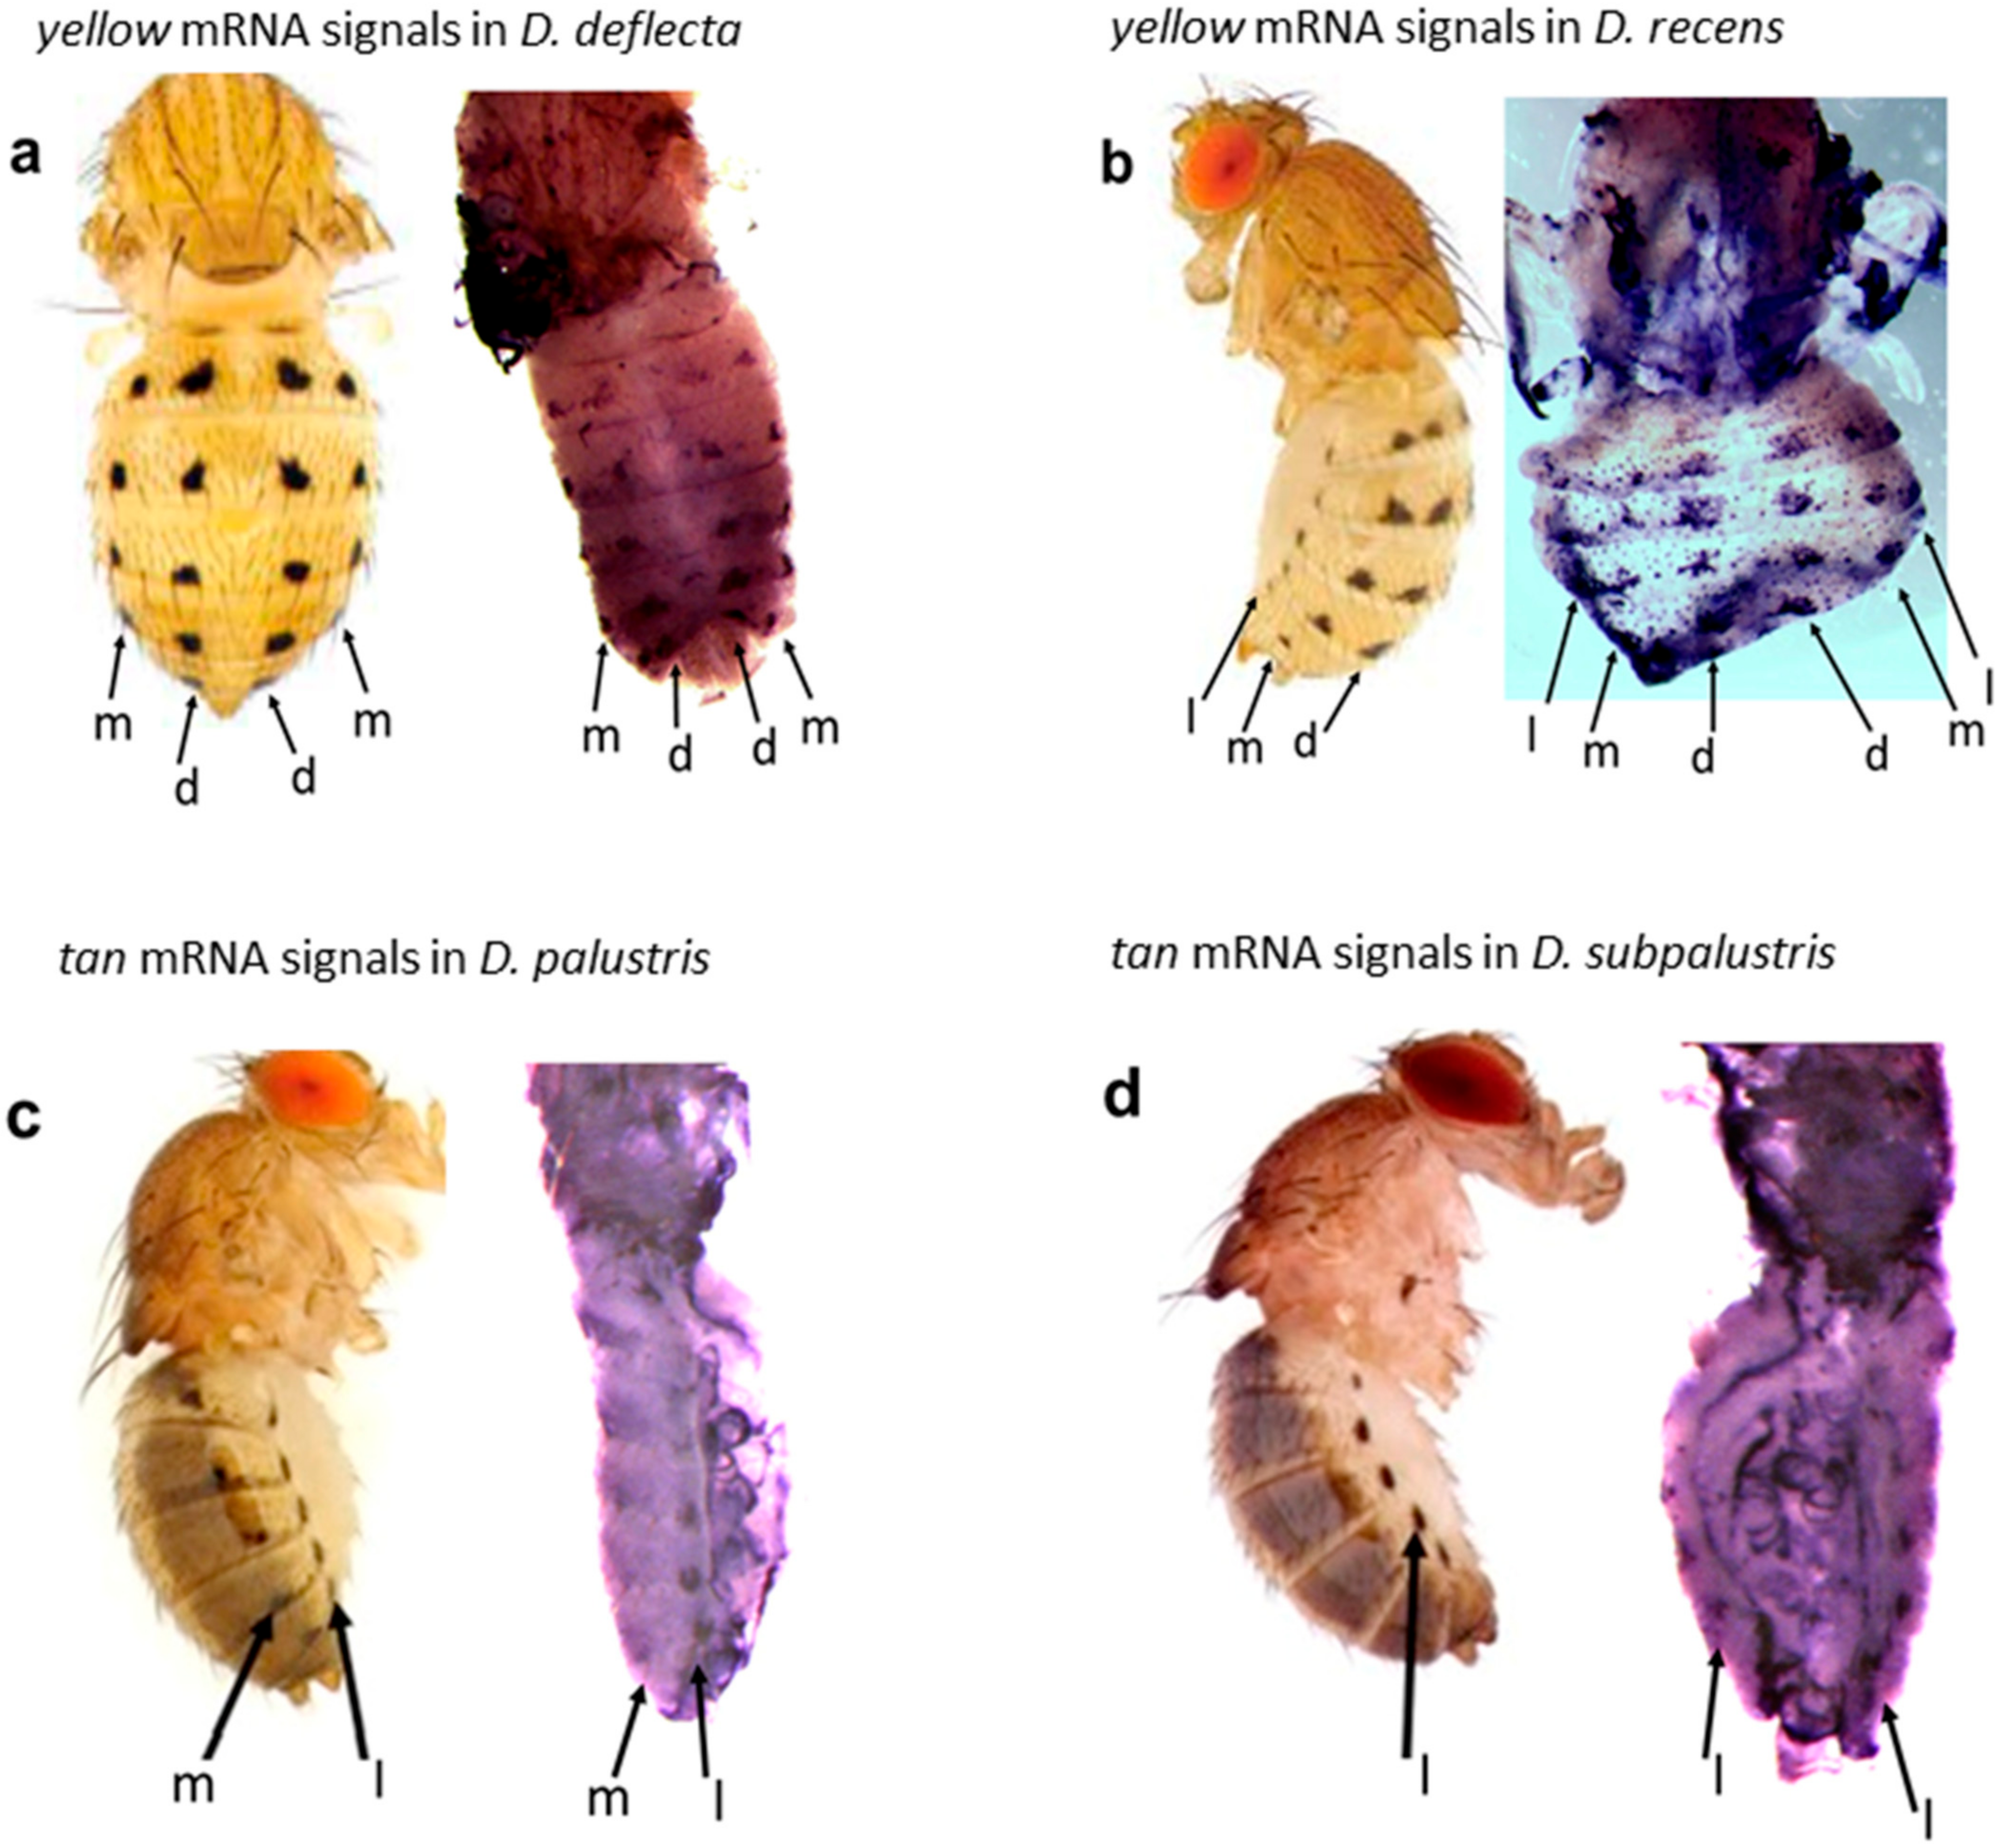
4. Expected Results
5. Troubleshooting
6. Reagents Setup
- 20× TAE. Add 1600 mL distilled water and a stir bar to a 2 L beaker, add 193.6 g of Trizma Base, 46 mL Glacial Acetic Acid, 1.5 g EDTA. Stir until everything dissolves. Adjust the pH to 8.0 with about 26 mL of 37% HCl. Add distilled water to make 2 L and stir a little more.
- LB medium. Add 1800 mL of distilled water and a stir bar to a 2 L beaker. Add 20 g of Tryptone, 10 g Yeast extract, and 20 g NaCl. Set pH to 7.5 with about 700 µL 5 M NaOH. Adjust volume with distilled water to 2 L and stir a little more. Fill into 1 L bottles with about 600 mL, then autoclave.
- 500 mL Ampicillin agar plates. Add 7.5 g of agar into 500 mL LB medium in a 1 L bottle and autoclave. Let it cool down until you can touch the bottle with your hands. Add 1 mL of ampicillin (at 100 mg/mL) per liter of agar to obtain a final concentration of 200 µg/mL. Swirl the medium to mix before pouring; be careful not to introduce bubbles. Pour into the medium-sized Petri dish, until it covers the bottom, approximately 30 mL. Store at 4 °C for 3 weeks.
- Hybridization solution. Add 200 mL of formamide and 100 mL 20× SSC. Set pH to 5.5 (check with color strips) and filter-sterilize. Then, add 4 mL of salmon sperm DNA (10 mg/mL), 40 mg heparin, 400 µL Tween 20, and 96 mL H2O. Mix thoroughly and store at −20 °C.
- 10× PBS. Add 1800 mL of distilled water and a stir bar to a 2-L beaker. Add 21.4 g of K2HPO4, 10.3 g KH2PO4, and 163.6 g NaCl. Adjust volume to 2 L and stir a little more. Fill into 1-L bottles with about 600 mL, then autoclave. Note: The pH is at around 6.5 now. Prepare 1× PBS by making 1:10 dilution in distilled water. This will cause the pH to go up to 7.0–7.2. This is where the pH should be.
- PBT. Add 100 mL of 10× PBS, 1 mL Triton X-100, and 900 mL distilled H2O.
- 20× SSC. Add 700 mL of distilled water and a stir bar to a 1-L beaker. Add 175.3 g of NaCl and 88.2 g sodium citrate. Adjust pH to 7.0 with about 2 drops of 37% HCl. Adjust the volume with distilled water to 1 L and stir. Fill into two 1-L bottles, then autoclave.
- Staining buffer (50 mL). Add 1 mL of 5 M NaCl, 2.5 mL 1 M MgCl2, 2.5 mL 2 M Tris pH 9.5, 50 µL Tween 20, and 44 mL distilled H2O. Make fresh staining buffer each time you perform an in situ and mix thoroughly before use.
- Staining solution (400 µL). Add 2.8 µL of NBT (50 mg/mL) and 1.4 µL BCIP (50 mg/mL) into 400 µL of freshly prepared staining buffer. Make fresh staining solution when required. Keep in the dark.
- Fixation buffer for abdominal ISH (40 mL). To a clean 50-mL Falcon tube, add 4 mL of 10× PBS, 85 µL 5 M NaOH, 20 mL sterile distilled H2O, and 80 mg deoxycholic acid. Vortex until the milky color (undissolved deoxycholic acid) disappears, then add 10 mL of 16% paraformaldehyde. Fill up to 40 mL with sterile distilled H2O. Store at 4 °C for maximum of one-month.
- Fixation buffer for wings ISH (PBT + 4% PFA). To a clean 50-mL Falcon tube, add 4 mL of 10× PBS, 10 mL 16% paraformaldehyde, 400 µL Triton X-100, and add 25.6 mL sterile distilled H2O. Store at 4 °C for maximum of one month.
Supplementary Materials
Author Contributions
Funding
Institutional Review Board Statement
Informed Consent Statement
Data Availability Statement
Acknowledgments
Conflicts of Interest
Appendix A
- Find the gene of interest in the D. melanogaster genomic sequence, using GenePalette software [26] (Genome Tools > Entrez Nucleotide Query).
- Do a local BLAST search, using the coding region of D. melanogaster as the query sequence against the D. guttifera genome. We perform BLAST search in our lab using “BlastStation-Local software”.
- To the GenePalette melanogaster file, add the D. guttifera sequence as a sequence comparison (Sequence > Add a Sequence Comparison). Set the comparison word size so that you can see what parts of the D. guttifera sequence match with the D. melanogaster sequence.
- Choose an exon that gives the best alignment result to design the primers.
- Naming the primers depends on the transcription direction, which is indicated by an arrow on the graphical representation of the gene organization in the GenePalette file (Figure S3). Therefore, if the arrow is facing the left, the for-ward primers will go from the right to the left and reverse primers will go from the left to the right. However, if the arrow is facing the right, forward primers will go from the left to the right and reverse primers will go from the right to the left.
- The gene-specific primers should contain 18–25 bases with a Tm of 55–60 °C, GC content of 50 ± 15%, and give rise to a product between 200–500 bp in length.
- The primers will be used for PCR amplification from genomic DNA, and the products will be cloned into pGEM®-TEasy.
CRITICAL STEP The annealing temperatures for the internal primers should be between 45 °C and 50 °C. Because the primers will be used with the pGEM®-TEasy vector primers M13F and M13R, which also have such low annealing temperatures.Appendix B
- Place a stained wing or abdomen into 300 µL of PBT in a glass-viewing dish.
- Use the Olympus SZX16 stereoscope with an SDF PLAPO 1× PF objective lens and a DP72 camera to image the abdomen.
- Take images of the lateral, dorsal, and ventral views of the abdomen, depend-ing on the location of the expression pattern.
- Take several images by slowly tuning the fine focus adjustment knob between the photo shots, starting from the top-most piece of tissue that comes into focus and progressing downwards, until the lowest-laying part of the tissue goes out of focus.
- Z-stack the raw images with Helicon Focus software.
- Use the “curves” function in Adobe Photoshop to reduce the background noise and maintain the natural colors of the image. Do not bend the “line” to avoid altering the ratios of the original result.
CRITICAL STEP The tissues are very fragile and brittle at this stage; therefore, minimize physical contact during imaging.Appendix C
- Use a 200-µL pipette with tip to take up a drop of gel slick (see Section 2.6).
- Dispense the drop into the first well of a glass-viewing dish.
- Then dip a clean Kimwipes paper into the drop and rub it into the remaining wells.
- Use another wipe to smear out any excess gel slick, only leaving a very thin coating in the wells.
References
- Gall, J.G.; Pardue, M.L. Formation and detection of RNA–DNA hybrid molecules in cytological preparations. Proc. Natl. Acad. Sci. USA 1969, 63, 378–783. [Google Scholar] [CrossRef] [Green Version]
- Hafen, E.; Levine, M.; Garber, R.L.; Gehring, W.J. An improved in situ hybridization method for the detection of cellular RNAs in Drosophila tissue sections and its application for localizing transcripts of the homeotic Antennapedia gene complex. EMBO J. 1983, 2, 617–623. [Google Scholar] [CrossRef] [PubMed]
- Tautz, D.; Pfeifle, C. A non-radioactive in situ hybridization method for the localization of specific RNAs in Drosophila embryos reveals translational control of the segmentation gene hunchback. Chromosoma 1989, 98, 81–85. [Google Scholar] [CrossRef] [PubMed]
- Tomancak, P.; Beaton, A.; Weiszmann, R.; Kwan, E.; Shu, S.; Lewis, S.E.; Richards, S.; Ashburner, M.; Harten-stein, V.; Celniker, S.E.; et al. Systematic determination of patterns of gene expression during Drosophila embryogenesis. Genome Biol. 2002, 3, 1–14. [Google Scholar] [CrossRef] [PubMed] [Green Version]
- Dion, W.A.; Shittu, M.O.; Steenwinkel, T.E.; Raja, K.K.; Kokate, P.P.; Werner, T. The modular expression patterns of three pigmentation genes prefigure unique abdominal morphologies seen among three Drosophila species. Gene Expr. Patterns 2020, 38, 119132. [Google Scholar] [CrossRef]
- Werner, T.; Koshikawa, S.; Williams, T.M.; Carroll, S.B. Generation of a novel wing colour pattern by the Wingless morphogen. Nature 2010, 464, 1143–1148. [Google Scholar] [CrossRef]
- Koshikawa, S.; Giorgianni, M.W.; Vaccaro, K.; Kassner, V.A.; Yoder, J.H.; Werner, T.; Carroll, S.B. Gain of cis-regulatory activities underlies novel domains of wingless gene expression in Drosophila. Proc. Natl. Acad. Sci. USA 2015, 112, 7524–7529. [Google Scholar] [CrossRef] [PubMed] [Green Version]
- Jehan, Z.; Uddin, S.; Al-Kuraya, S.K. In-situ hybridization as a molecular tool in cancer diagnosis and treatment. Curr. Med. Chem. 2012, 19, 3730–3738. [Google Scholar] [CrossRef] [PubMed]
- Küpper, H.; Seib, L.O.; Sivaguru, M.; Hoekenga, O.A.; Kochian, L.V. A method for cellular localization of gene expression via quantitative in situ hybridization in plants. Plant J. 2007, 50, 159–187. [Google Scholar] [CrossRef]
- Duck, N.B. RNA in situ hybridization in plants. In Plant Molecular Biology Manual; Springer International Publishing: Geneva, Switzerland, 1994; pp. 335–347. [Google Scholar]
- Sørdal, Ø.; Qvigstad, G.; Nordrum, I.S.; Gustafsson, B.; Waldum, H.L. In situ hybridization in human and rodent tissue by the use of a new and simplified method. Appl. Immunohistochem. Mol. Morphol. 2013, 21, 185–189. [Google Scholar] [CrossRef]
- Jessie, K.; Fong, M.Y.; Devi, S.; Lam, S.K.; Wong, K.T. Localization of dengue virus in naturally infected hu-man tissues, by immunohistochemistry and in situ hybridization. J. Infect. Dis. 2004, 189, 1411–1418. [Google Scholar] [CrossRef]
- Koshiba-Takeuchi, K. Whole-mount and section in situ hybridization in mouse embryos for detecting mRNA expression and localization. In Mouse Embryogenesis; Humana Press: New York, NY, USA, 2018; pp. 123–131. [Google Scholar]
- Özsu, N.; Chan, Q.Y.; Chen, B.; Das Gupta, M.; Monteiro, A. Wingless is a positive regulator of eyespot color patterns in Bicyclus anynana butterflies. Dev. Biol. 2017, 429, 177–185. [Google Scholar] [CrossRef] [PubMed]
- Hauptmann, G. One-, two-, and three-color whole-mount in situ hybridization to Drosophila embryos. Methods 2001, 23, 359–372. [Google Scholar] [CrossRef]
- Weiszmann, R.; Hammonds, A.S.; Celniker, S.E. Determination of gene expression patterns using high-throughput RNA in situ hybridization to whole-mount Drosophila embryos. Nat. Protoc. 2009, 4, 605–618. [Google Scholar] [CrossRef] [Green Version]
- Grover, S.; Williams, M.E.; Kaiser, R.; Hughes, J.T.; Gresham, L.; Rebeiz, M.; Williams, T.M. Augmentation of a wound response element accompanies the origin of a Hox-regulated Drosophila abdominal pigmentation trait. Dev. Biol. 2018, 441, 159–175. [Google Scholar] [CrossRef] [PubMed]
- Hughes, J.T.; Williams, M.E.; Johnson, R.; Grover, S.; Rebeiz, M.; Williams, T.M. Gene regulatory network homoplasy underlies recurrent sexually dimorphic fruit fly pigmentation. Front. Ecol. Evol. 2020, 8, 80. [Google Scholar] [CrossRef] [Green Version]
- Vincent, B.J.; Rice, G.R.; Wong, G.M.; Glassford, W.J.; Downs, K.I.; Shastay, J.L.; Charles-Obi, K.; Natarajan, M.; Gogol, M.; Zeitlinger, J.; et al. An atlas of transcription factors expressed in male pupal terminalia of Drosophila melanogaster. G3 Genes Genomes Genet. 2019, 9, 3961–3972. [Google Scholar] [CrossRef] [Green Version]
- Raja, K.K.; Shittu, M.O.; Nouhan, P.M.; Steenwinkel, T.E.; Bachman, E.A.; Kokate, P.P.; McQueeney, A.H.; Mundell, E.A.; Armentrout, A.A.; Peabody, A.M.; et al. The regulation of a pigmentation gene in the formation of complex color patterns in Drosophila abdomens. BioRxiv 2020. [Google Scholar] [CrossRef] [Green Version]
- Wittkopp, P.J.; Beldade, P. Development and evolution of insect pigmentation: Genetic mechanisms and the potential consequences of pleiotropy. Semin. Cell Dev. Biol. 2009, 20, 65–71. [Google Scholar] [CrossRef]
- Weatherbee, S.D.; Nijhout, H.F.; Grunert, L.W.; Halder, G.; Galant, R.; Selegue, J.; Carroll, S. Ultrabithorax function in butterfly wings and the evolution of insect wing patterns. Curr. Biol. 1999, 9, 109–115. [Google Scholar] [CrossRef] [Green Version]
- Werner, T.; Steenwinkel, T.; Jaenike, J. The Encyclopedia of North American Drosophilids Volume 1: Drosophilids of the Midwest and Northeast; J. Robert Van Pelt and Ruanne Opie Library; Michigan Technological University: Houghton, MI, USA, 2018. [Google Scholar]
- Werner, T.; Steenwinkel, T.; Jaenike, J. The Encyclopedia of North American Drosophilids Volume 2: Drosophilids of the Southeast; J. Robert Van Pelt and John and Ruanne Opie Library; Michigan Technological University: Houghton, MI, USA, 2020. [Google Scholar]
- Bainbridge, S.P.; Bownes, M. Staging the metamorphosis of Drosophila melanogaster. Development 1981, 66, 57–80. [Google Scholar]
- Rebeiz, M.; Posakony, J.W. GenePalette: A universal software tool for genome sequence visualization and analysis. Dev. Biol. 2004, 271, 431–438. [Google Scholar] [CrossRef] [PubMed] [Green Version]
- Fukutomi, Y.; Matsumoto, K.; Funayama, N.; Koshikawa, S. Methods for staging pupal periods and measurement of wing pigmentation of Drosophila guttifera. JoVE 2018, 131, 56935. [Google Scholar] [CrossRef] [PubMed]


| Reagent | Volume Per Reaction (µL) |
|---|---|
| Taq 2× MeanGreen Master Mix | 12.5 |
| Forward primer (10 pmol/µL) | 1.25 |
| Reverse primer (10 pmol/µL) | 1.25 |
| Genomic DNA (0.09–0.2 µg/µL) | 0.25 |
| d H2O | 9.8 |
| Total | 25.0 |
| Reaction | Temperature | Time | Cycle Number |
|---|---|---|---|
| Initial Denaturation | 95 °C | 5 min | 35 cycles |
| Denaturation | 92 °C | 30 s | |
| Annealing | X °C | 30 s | |
| Extension | 72 °C | 1 min per kb | |
| Final Extension | 72 °C | 5 min |
| Reagent | Volume Per Reaction (µL) |
|---|---|
| PCR product (0.05–0.1 µg/µL) | 7.0 |
| dATP/dNTP (10 mM) | 1.0 |
| 10× PCR buffer | 1.0 |
| Taq Polymerase (5 U/ µL) | 1.0 |
| Total | 10 |
| Reagent | Volume Per Reaction (µL) |
|---|---|
| A-tailed PCR product (0.05–0.1 µg/µL) | 3.5 |
| 2× ligation buffer | 5 |
| pGEM®-TEasy vector (0.05 µg) | 0.5 |
| T4 DNA ligase | 1 |
| Total | 10 |
| Reagent | Volume Per Reaction (µL) |
|---|---|
| 10× PCR buffer | 1 |
| dNTP mix (10 mM) | 0.5 |
| Internal forward primer (10 pmol/µL) | 0.5 |
| Internal reverse primer (10 pmol/µL) | 0.5 |
| Taq polymerase (5 U/µL) | 0.2 |
| d H2O | 15.3 |
| Bacterial suspension | 2 |
| Total | 20 |
| Reaction | Temperature | Time | Cycle Number |
|---|---|---|---|
| Initial Denaturation | 95 °C | 5 min | 35 cycles |
| Denaturation | 92 °C | 30 s | |
| Annealing | X °C | 30 s | |
| Extension | 72 °C | 1 min per kb | |
| Final Extension | 72 °C | 10 min |
| Reagent | Volume Per Reaction (µL) |
|---|---|
| 10× PCR buffer | 2.0 |
| dNTP mix (10 mM) | 0.5 |
| M13F (vector primer) (10 pmol/µL) | 0.5 |
| Internal gene-specific primer (forward or reverse) (10 pmol/µL) | 0.5 |
| Taq polymerase (5 U/µL) | 0.2 |
| dH2O | 16.2 |
| Mini-prep DNA (insert in pGEM®-TEasy) | 0.1 |
| Total | 20 |
| Reaction | Temperature | Time | Cycle Number |
|---|---|---|---|
| Initial Denaturation | 95 °C | 5 min | 35 cycles |
| Denaturation | 92 °C | 30 s | |
| Annealing | 45 °C | 30 s | |
| Extension | 72 °C | 1 min per kb | |
| Final Extension | 72 °C | 5 min |
| Reagent | Volume Per Reaction (µL) |
|---|---|
| Taq 2× MeanGreen Master Mix | 12.5 |
| M13F (vector forward primer) (10 pmol/µL) | 1.25 |
| M13R (vector reverse primer) (10 pmol/µL) | 1.25 |
| Mini-prep DNA (0.1–0.5 µg/µL) | 0.1 |
| d H2O | 9.9 |
| Total | 25 |
| Reagent | Volume Per Reaction (µL) |
|---|---|
| Purified PCR product (0.05–0.1 µg/µL) | 6.5 |
| 10× NTP labeling mixture | 1 |
| 10× Transcription buffer | 1 |
| Protector RNAse inhibitor | 0.5 |
| Sp6 RNA polymerase or T7 RNA polymerase | 1 |
| Total | 10 |
| Reagent | Volume Per Reaction (µL) |
|---|---|
| Probe (from step 54) | 9 |
| Linear acrylamide (5 µg/µL) | 1 |
| 3 M Sodium acetate pH 5.5 | 1 |
| 200-Proof ethanol | 22.5 |
| Total | 33.5 |
| Step | Problem | Possible Cause | Solution |
|---|---|---|---|
| 3 | No PCR product | Poor primer design | Ensure the primers are made from the highly conserved region. Check the primer design |
| Low-quality genomic DNA | Check the genomic DNA on agarose gel | ||
| Poor cycling conditions | Adjust the PCR conditions as needed | ||
| 26 | No positive colonies | Failed ligation | Ensure A-tail are added to the PCR products before ligation with the pGEM®-TEasy vector. Note that the A-tails may fall off by keeping the PCR product at −20 °C for one month |
| 47 | Lack of PCR product after insertion direction PCR | No insert or wrong insert in the pGEM®-TEasy vector | Perform a PCR with the internal primers to check that the correct insert is in the vector or sequence the plasmid instead. |
| Wrong primer pairs are used | Ensure to use the internal forward versus M13F, and internal reverse versus M13F primer pairs | ||
| The species-specific internal primers’ melting temperature does not match the M13F vector primer | Design species-specific internal primers with melting temperatures between 45 °C and 50 °C | ||
| 58 | Agarose gel analysis showing no RNA probe | Poor probe synthesis reaction | Repeat probe synthesis reaction. Avoid RNAse interference |
| 133 | Purple staining is visible but weak | Low gene expression or inadequate staining time | Stain the tissue longer (overnight). Ensure the tissues are adequately permeabilized with the Proteinase K solution |
| High background staining | Over-staining | Check for signal every 30 min | |
| Poor tissue treatment | Use the appropriate Proteinase K concentration, and ensure correct duration of treatment | ||
| No in situ signal | Gene may not be expressed | Always perform positive and negative controls to rule out bad reagents | |
| The traditional negative controls for an antisense probe are the sense probe. Therefore, the use of a sense probe will give no signal. | Use the appropriate RNA polymerase to synthesize the anti-sense probe Be sure to use an antisense probe for your test samples | ||
| RNAse might have destroyed the mRNA or the RNA probe | Avoid talking, coughing, and sneezing into the sample. Always use gloves when performing ISH |
Publisher’s Note: MDPI stays neutral with regard to jurisdictional claims in published maps and institutional affiliations. |
© 2021 by the authors. Licensee MDPI, Basel, Switzerland. This article is an open access article distributed under the terms and conditions of the Creative Commons Attribution (CC BY) license (http://creativecommons.org/licenses/by/4.0/).
Share and Cite
Shittu, M.; Steenwinkel, T.; Dion, W.; Ostlund, N.; Raja, K.; Werner, T. RNA In Situ Hybridization for Detecting Gene Expression Patterns in the Abdomens and Wings of Drosophila Species. Methods Protoc. 2021, 4, 20. https://0-doi-org.brum.beds.ac.uk/10.3390/mps4010020
Shittu M, Steenwinkel T, Dion W, Ostlund N, Raja K, Werner T. RNA In Situ Hybridization for Detecting Gene Expression Patterns in the Abdomens and Wings of Drosophila Species. Methods and Protocols. 2021; 4(1):20. https://0-doi-org.brum.beds.ac.uk/10.3390/mps4010020
Chicago/Turabian StyleShittu, Mujeeb, Tessa Steenwinkel, William Dion, Nathan Ostlund, Komal Raja, and Thomas Werner. 2021. "RNA In Situ Hybridization for Detecting Gene Expression Patterns in the Abdomens and Wings of Drosophila Species" Methods and Protocols 4, no. 1: 20. https://0-doi-org.brum.beds.ac.uk/10.3390/mps4010020