
Development of a 3D Printer for the Manufacture of Functional Food Protein Gels

 , and
, and
Abstract
: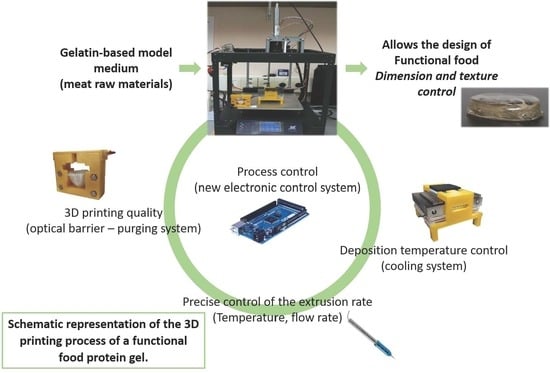
1. Introduction
2. Materials and Methods
2.1. 3D Printers and Extruders
2.2. Design Method
2.3. Characterization of the 3D Printer
2.3.1. Effect of Thermal Control of the Printhead on the Flow Rate of the Extruder
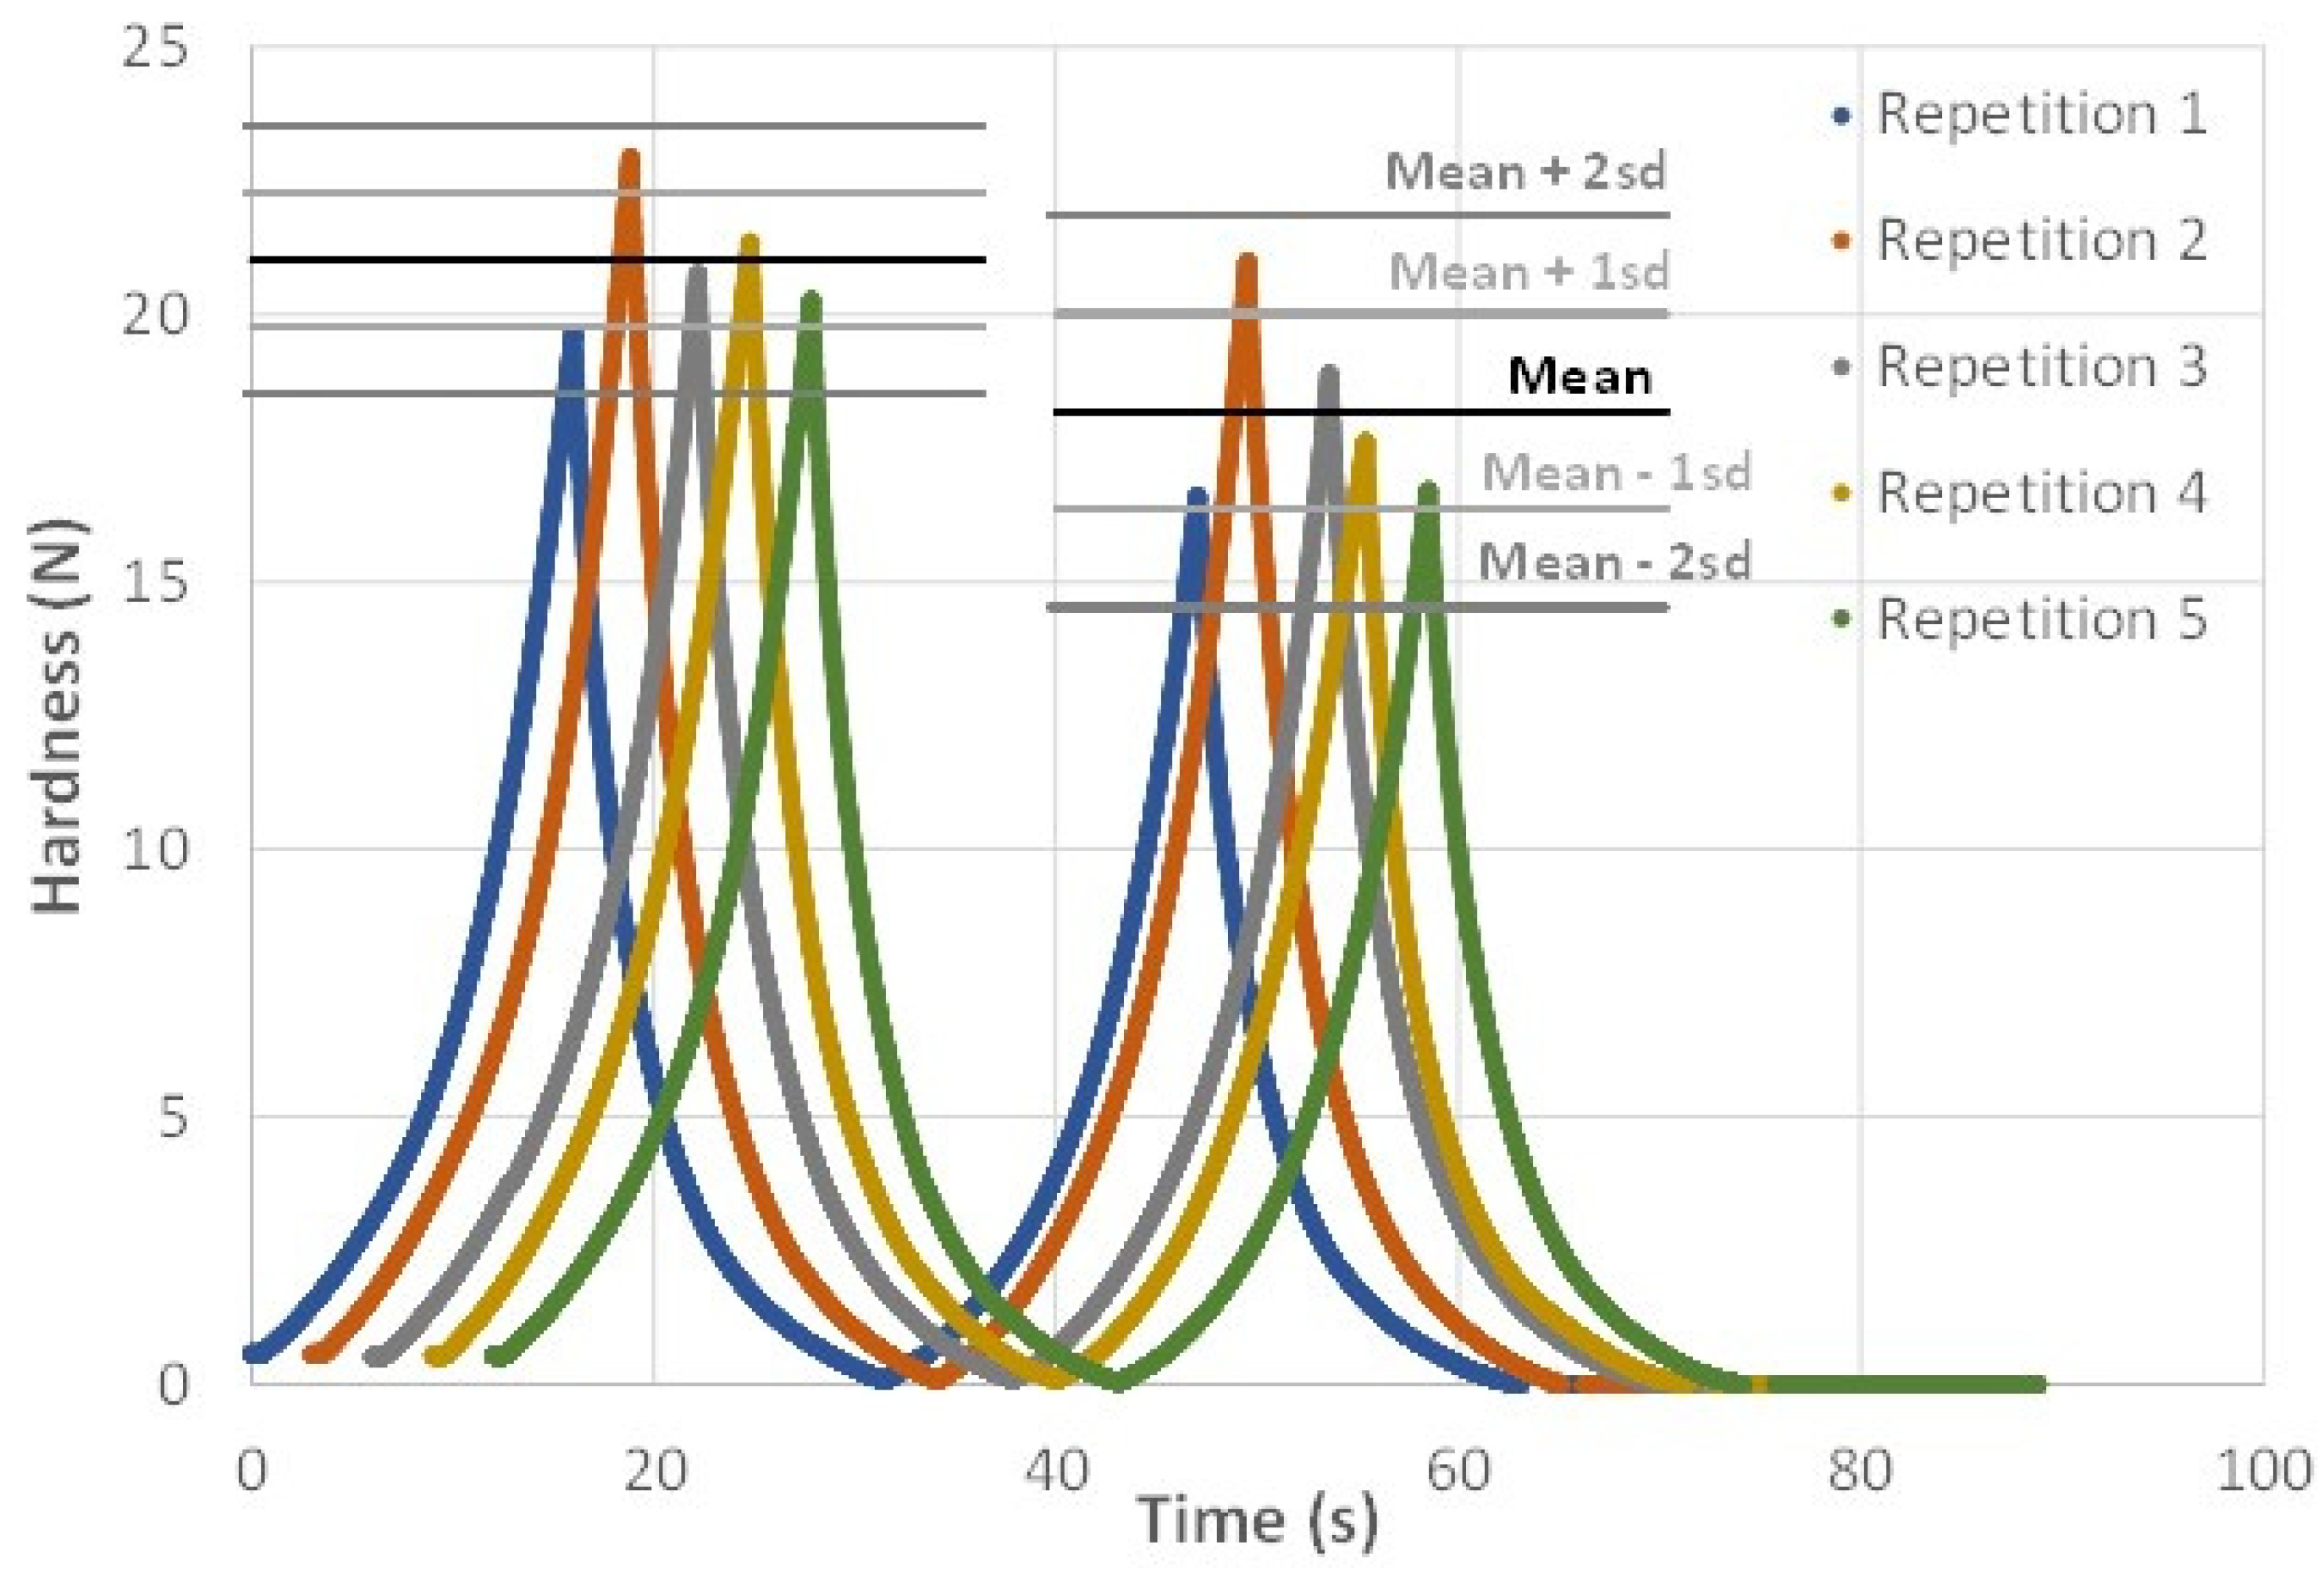
2.3.2. Effect of the 3D Printing Process on the Print Repeatability of Protein Gels
2.3.3. Effect of Thermal Gradient (Printing Plate) on the Printing of Protein Gels
3. Results and Discussion
3.1. First Prototype—Drawbacks and Limitations
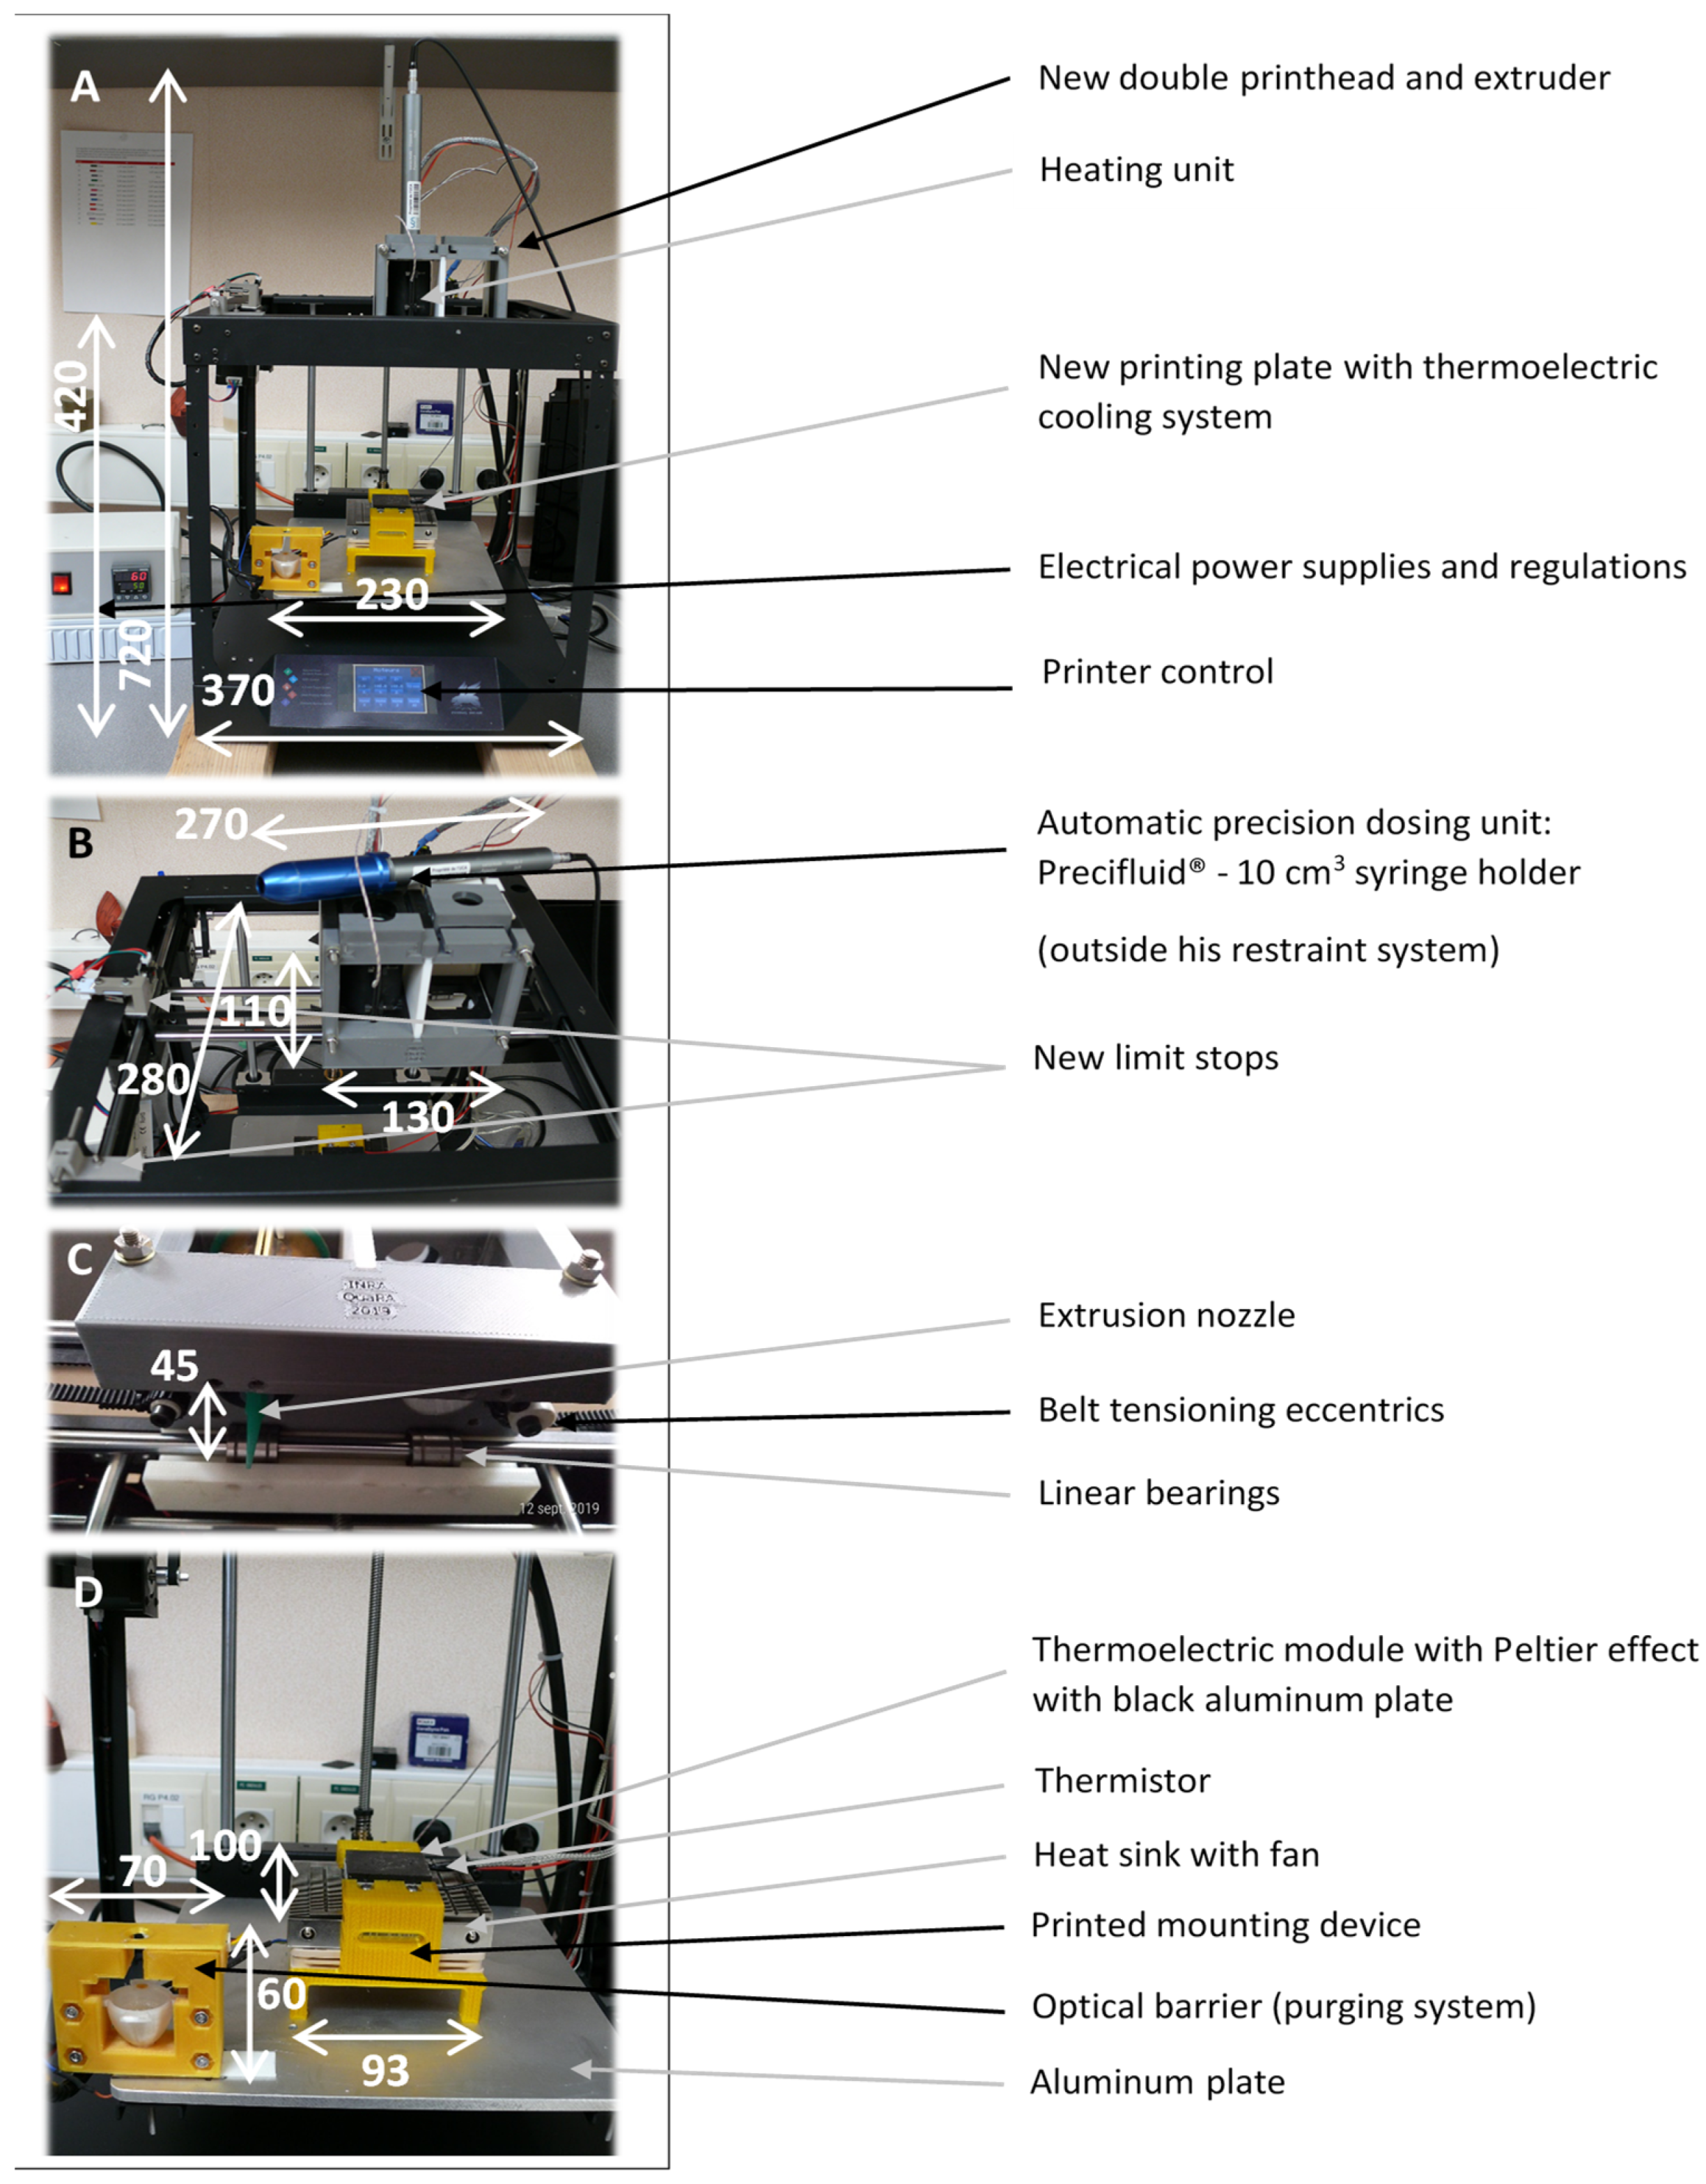
3.2. Second Prototype
3.2.1. Hardware Control
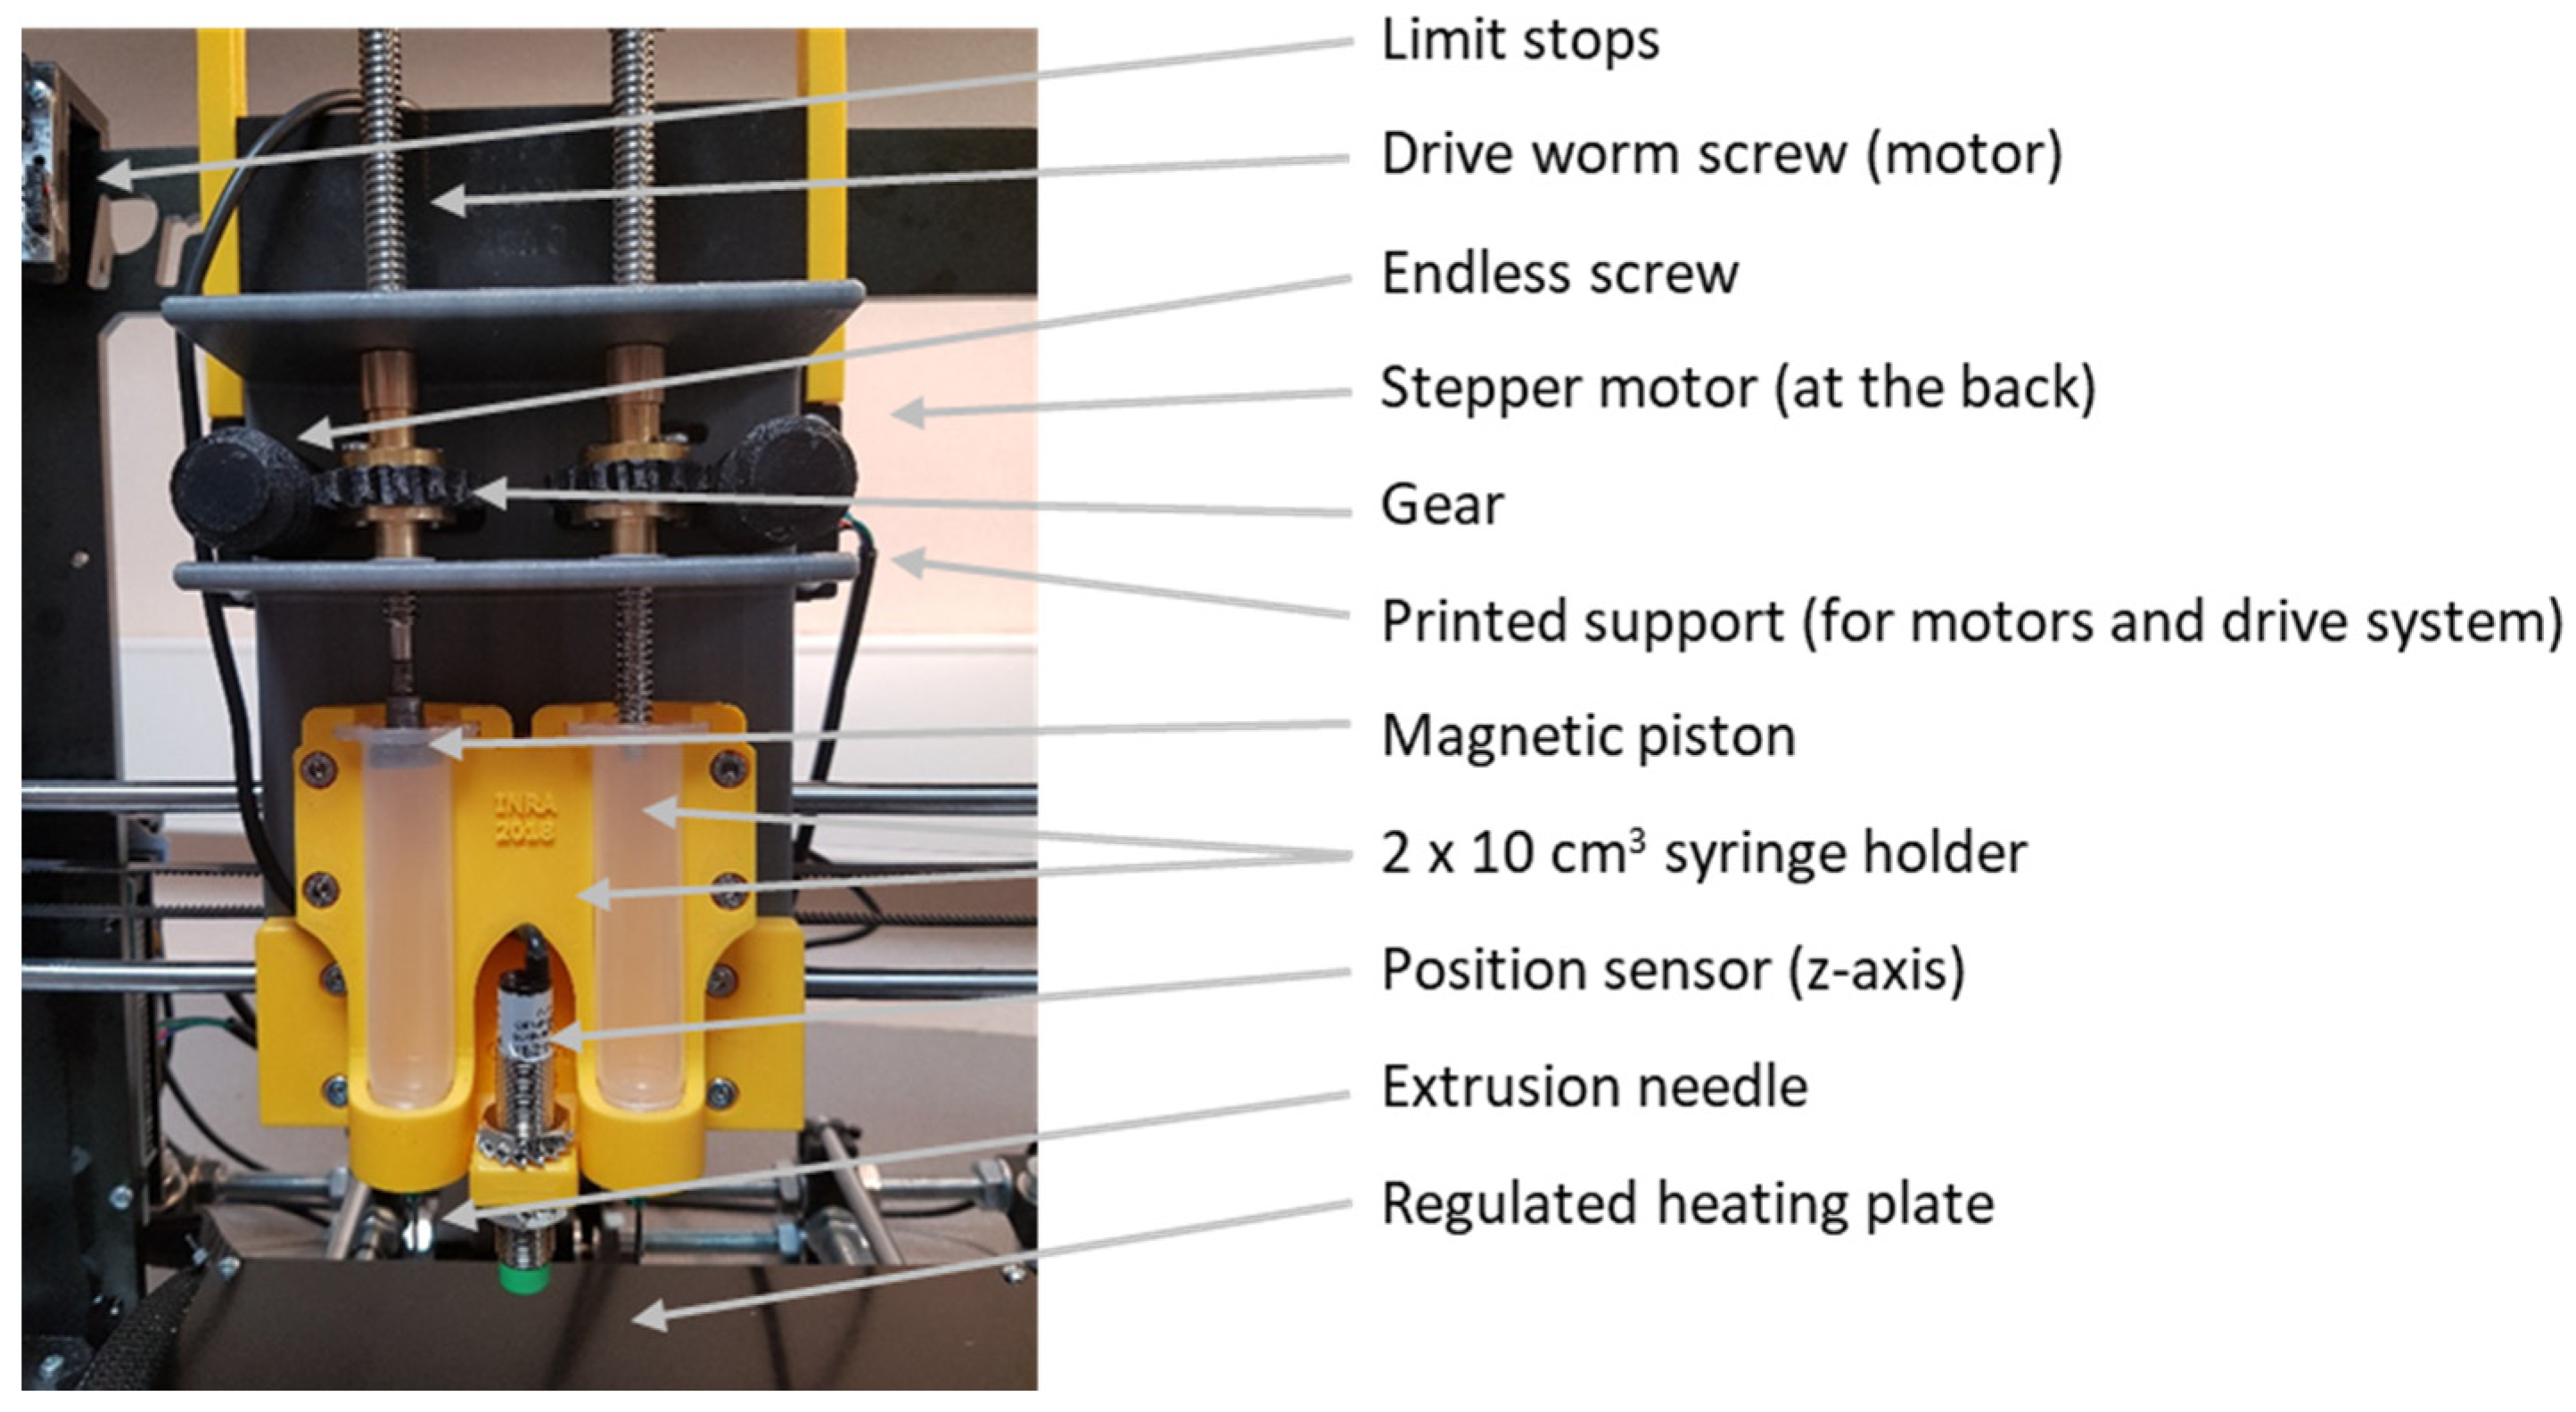
3.2.2. Printhead Design
3.2.3. Printing Plate Design
3.3. Characterization of the 3D Printer Components
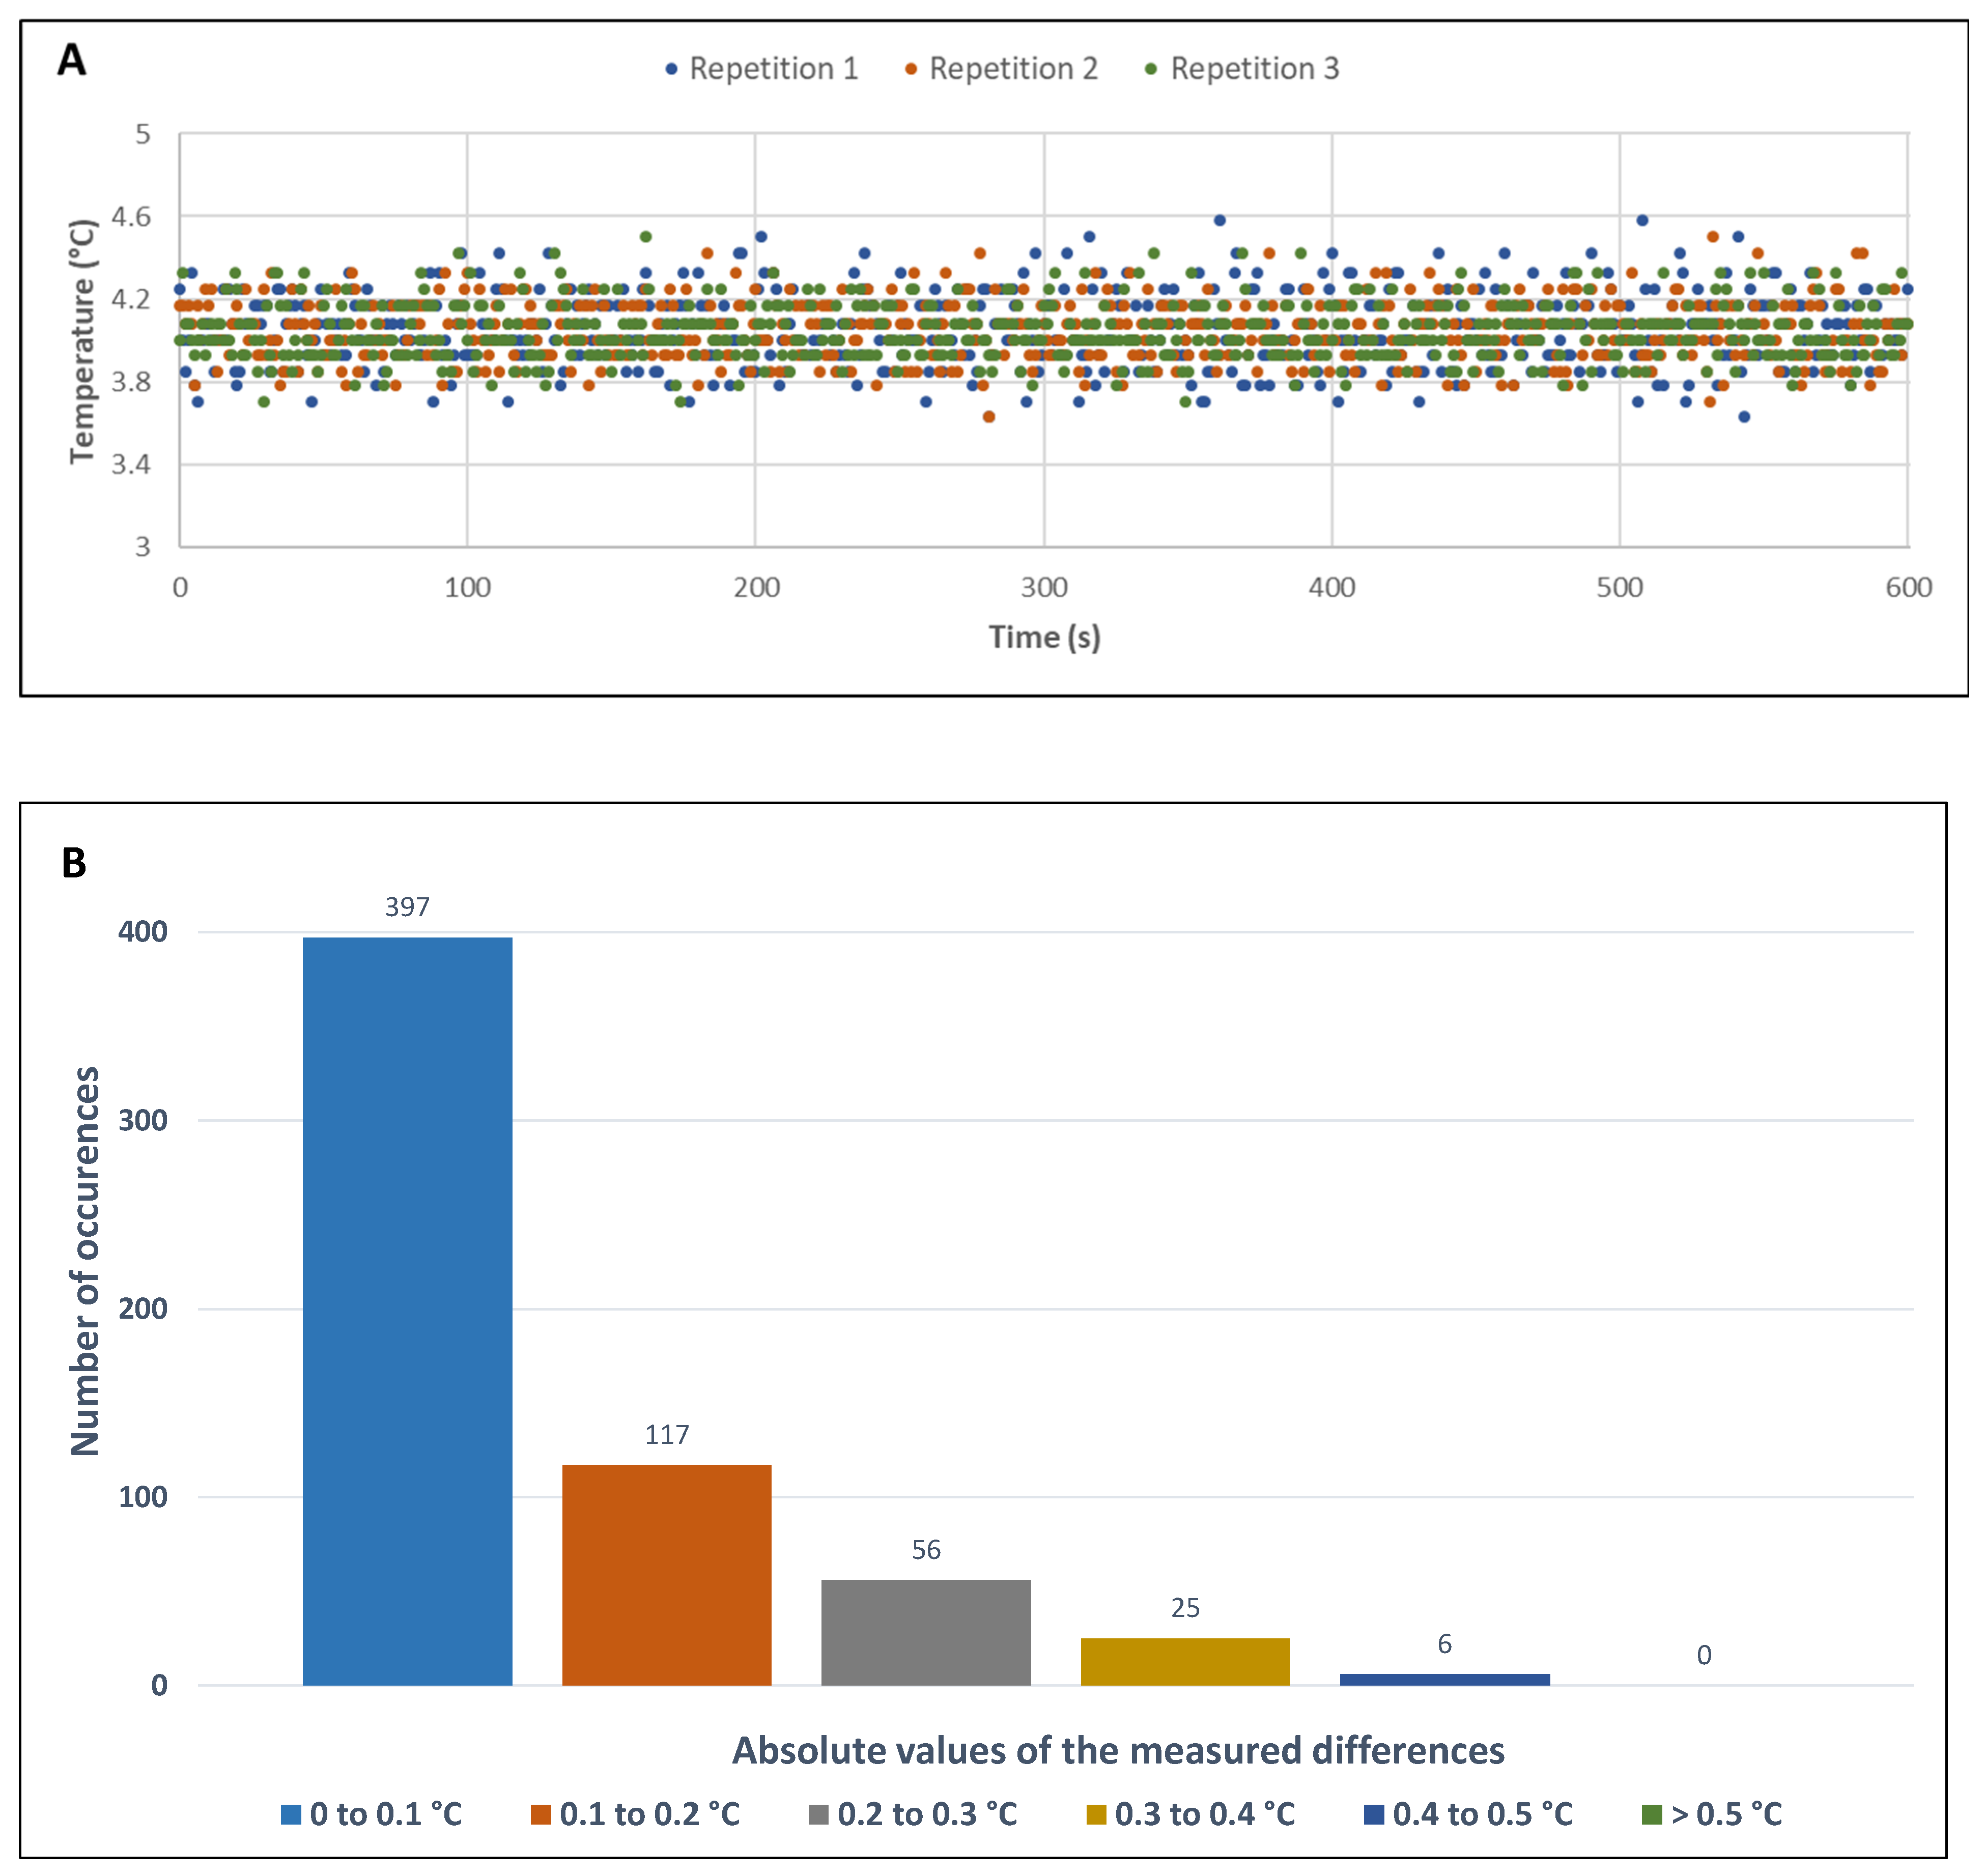
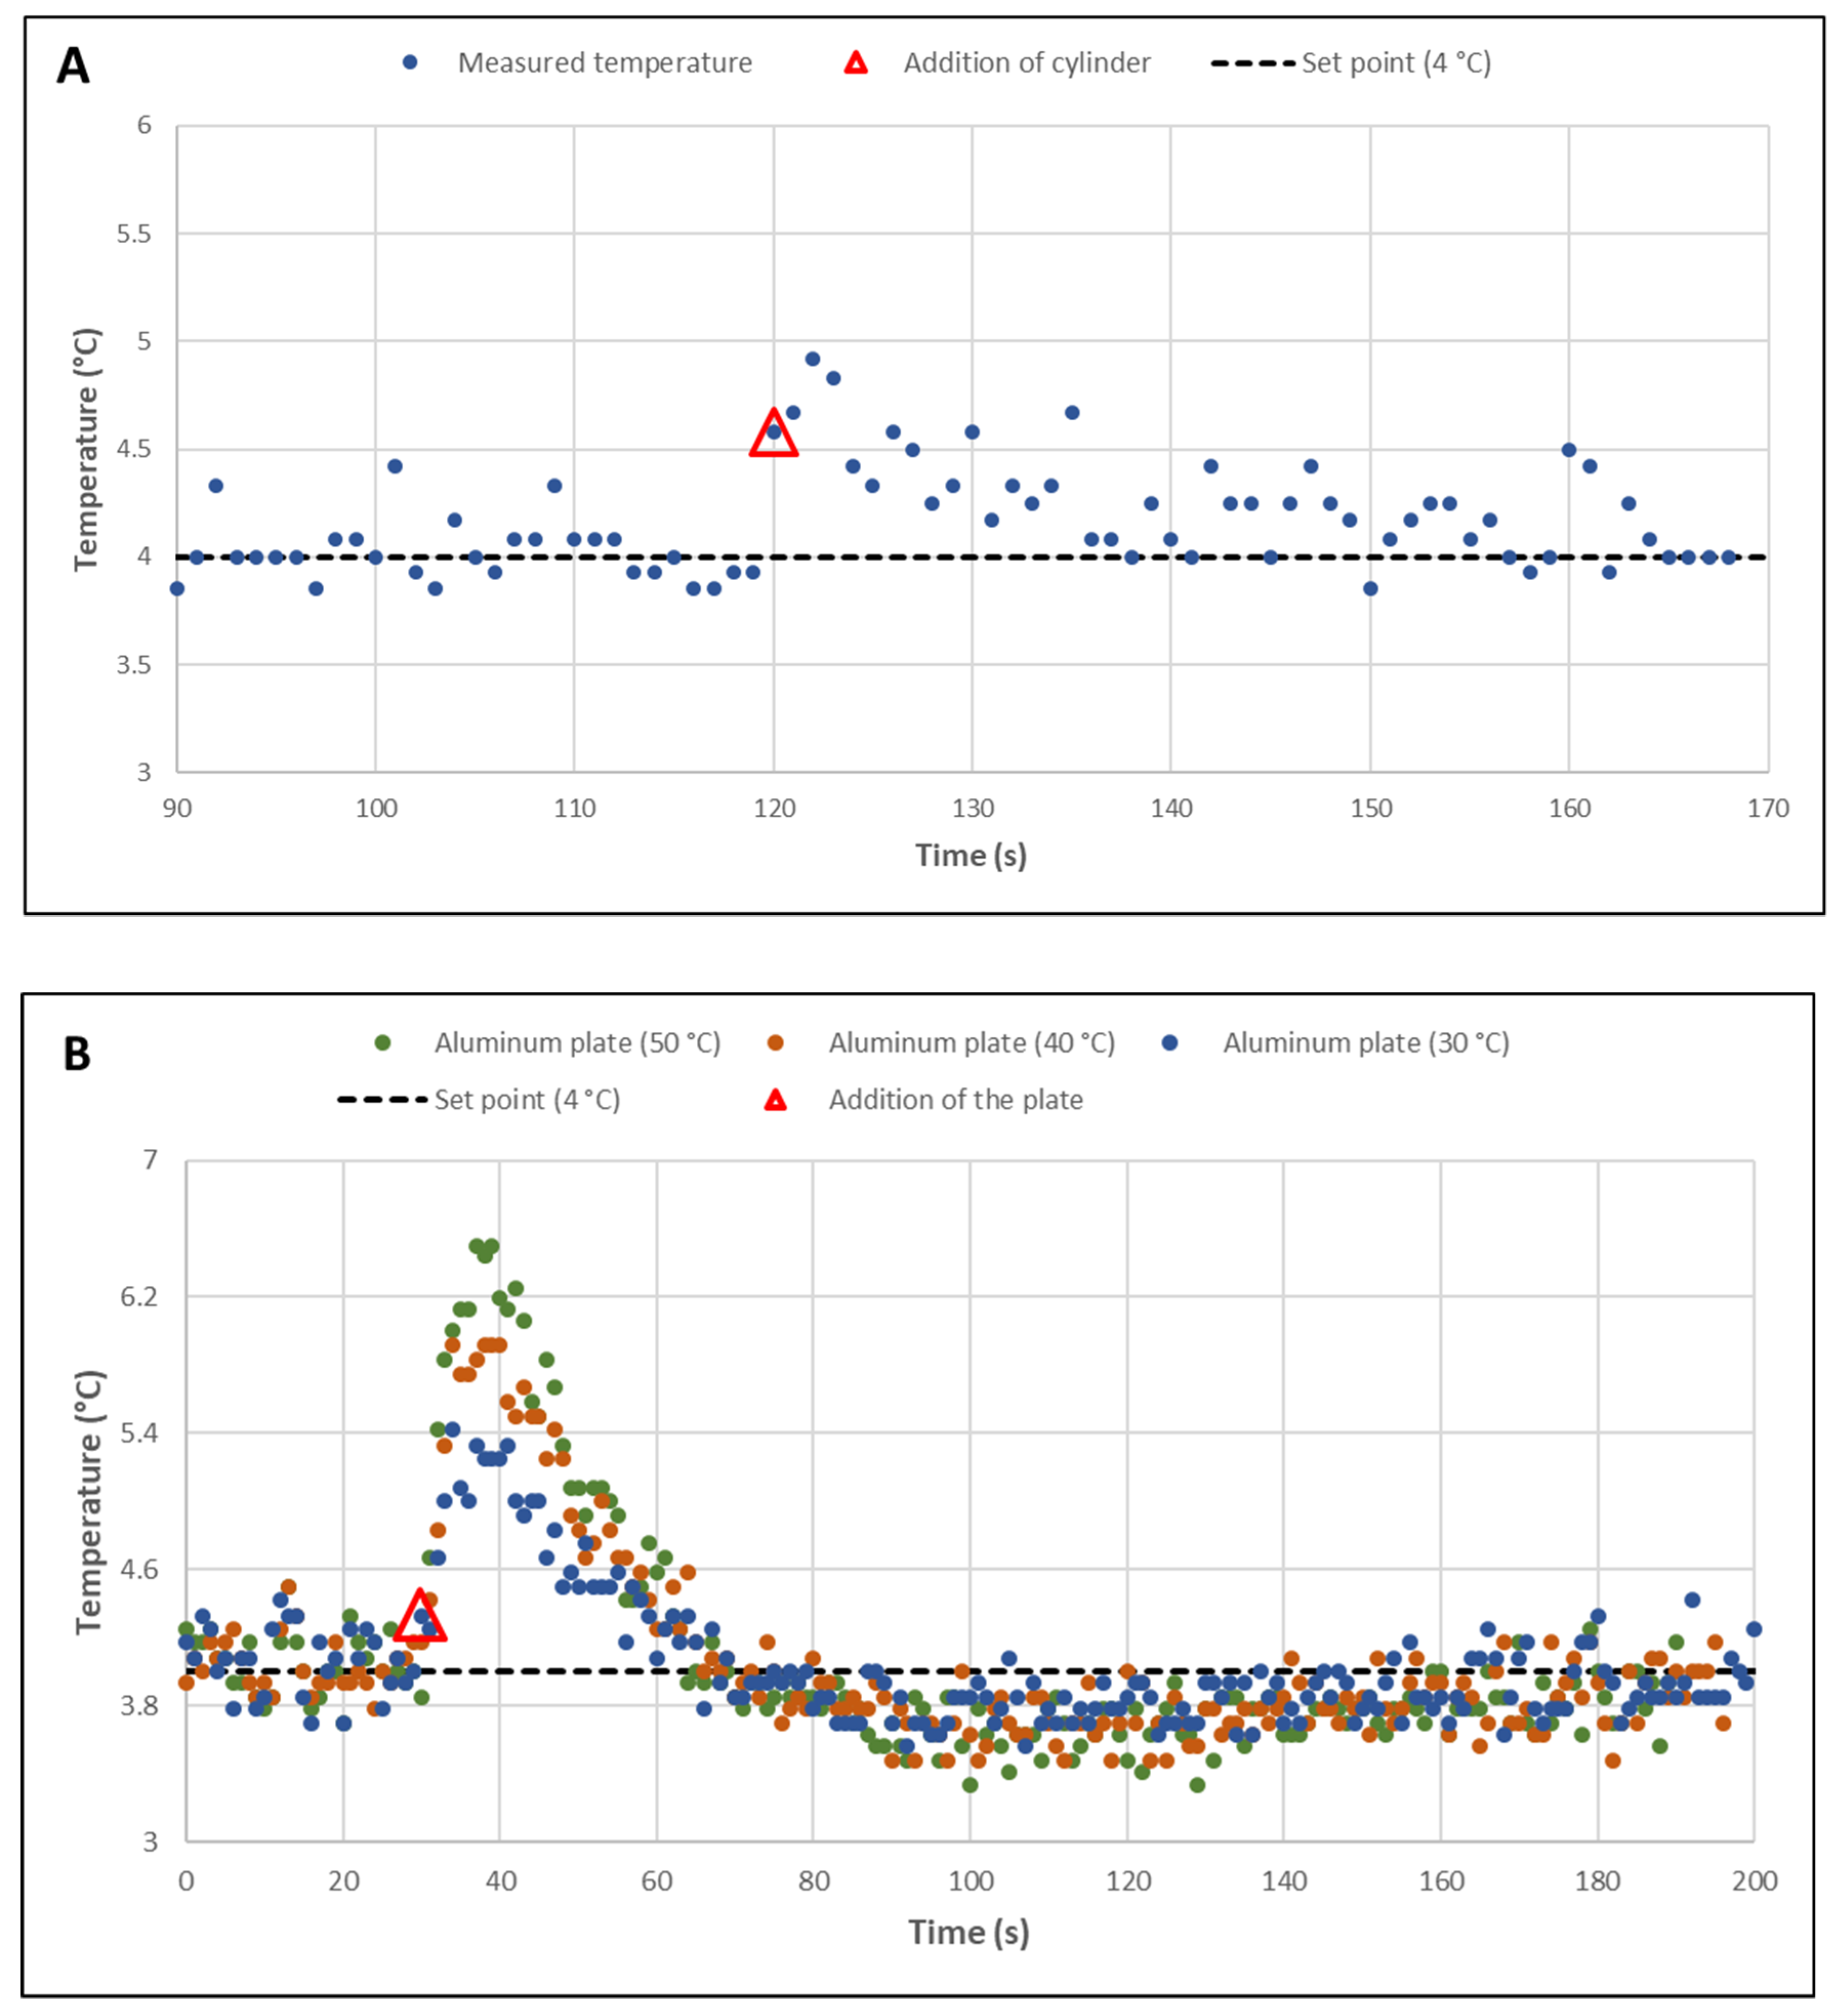
3.3.1. Printing Plate Temperature Regulation
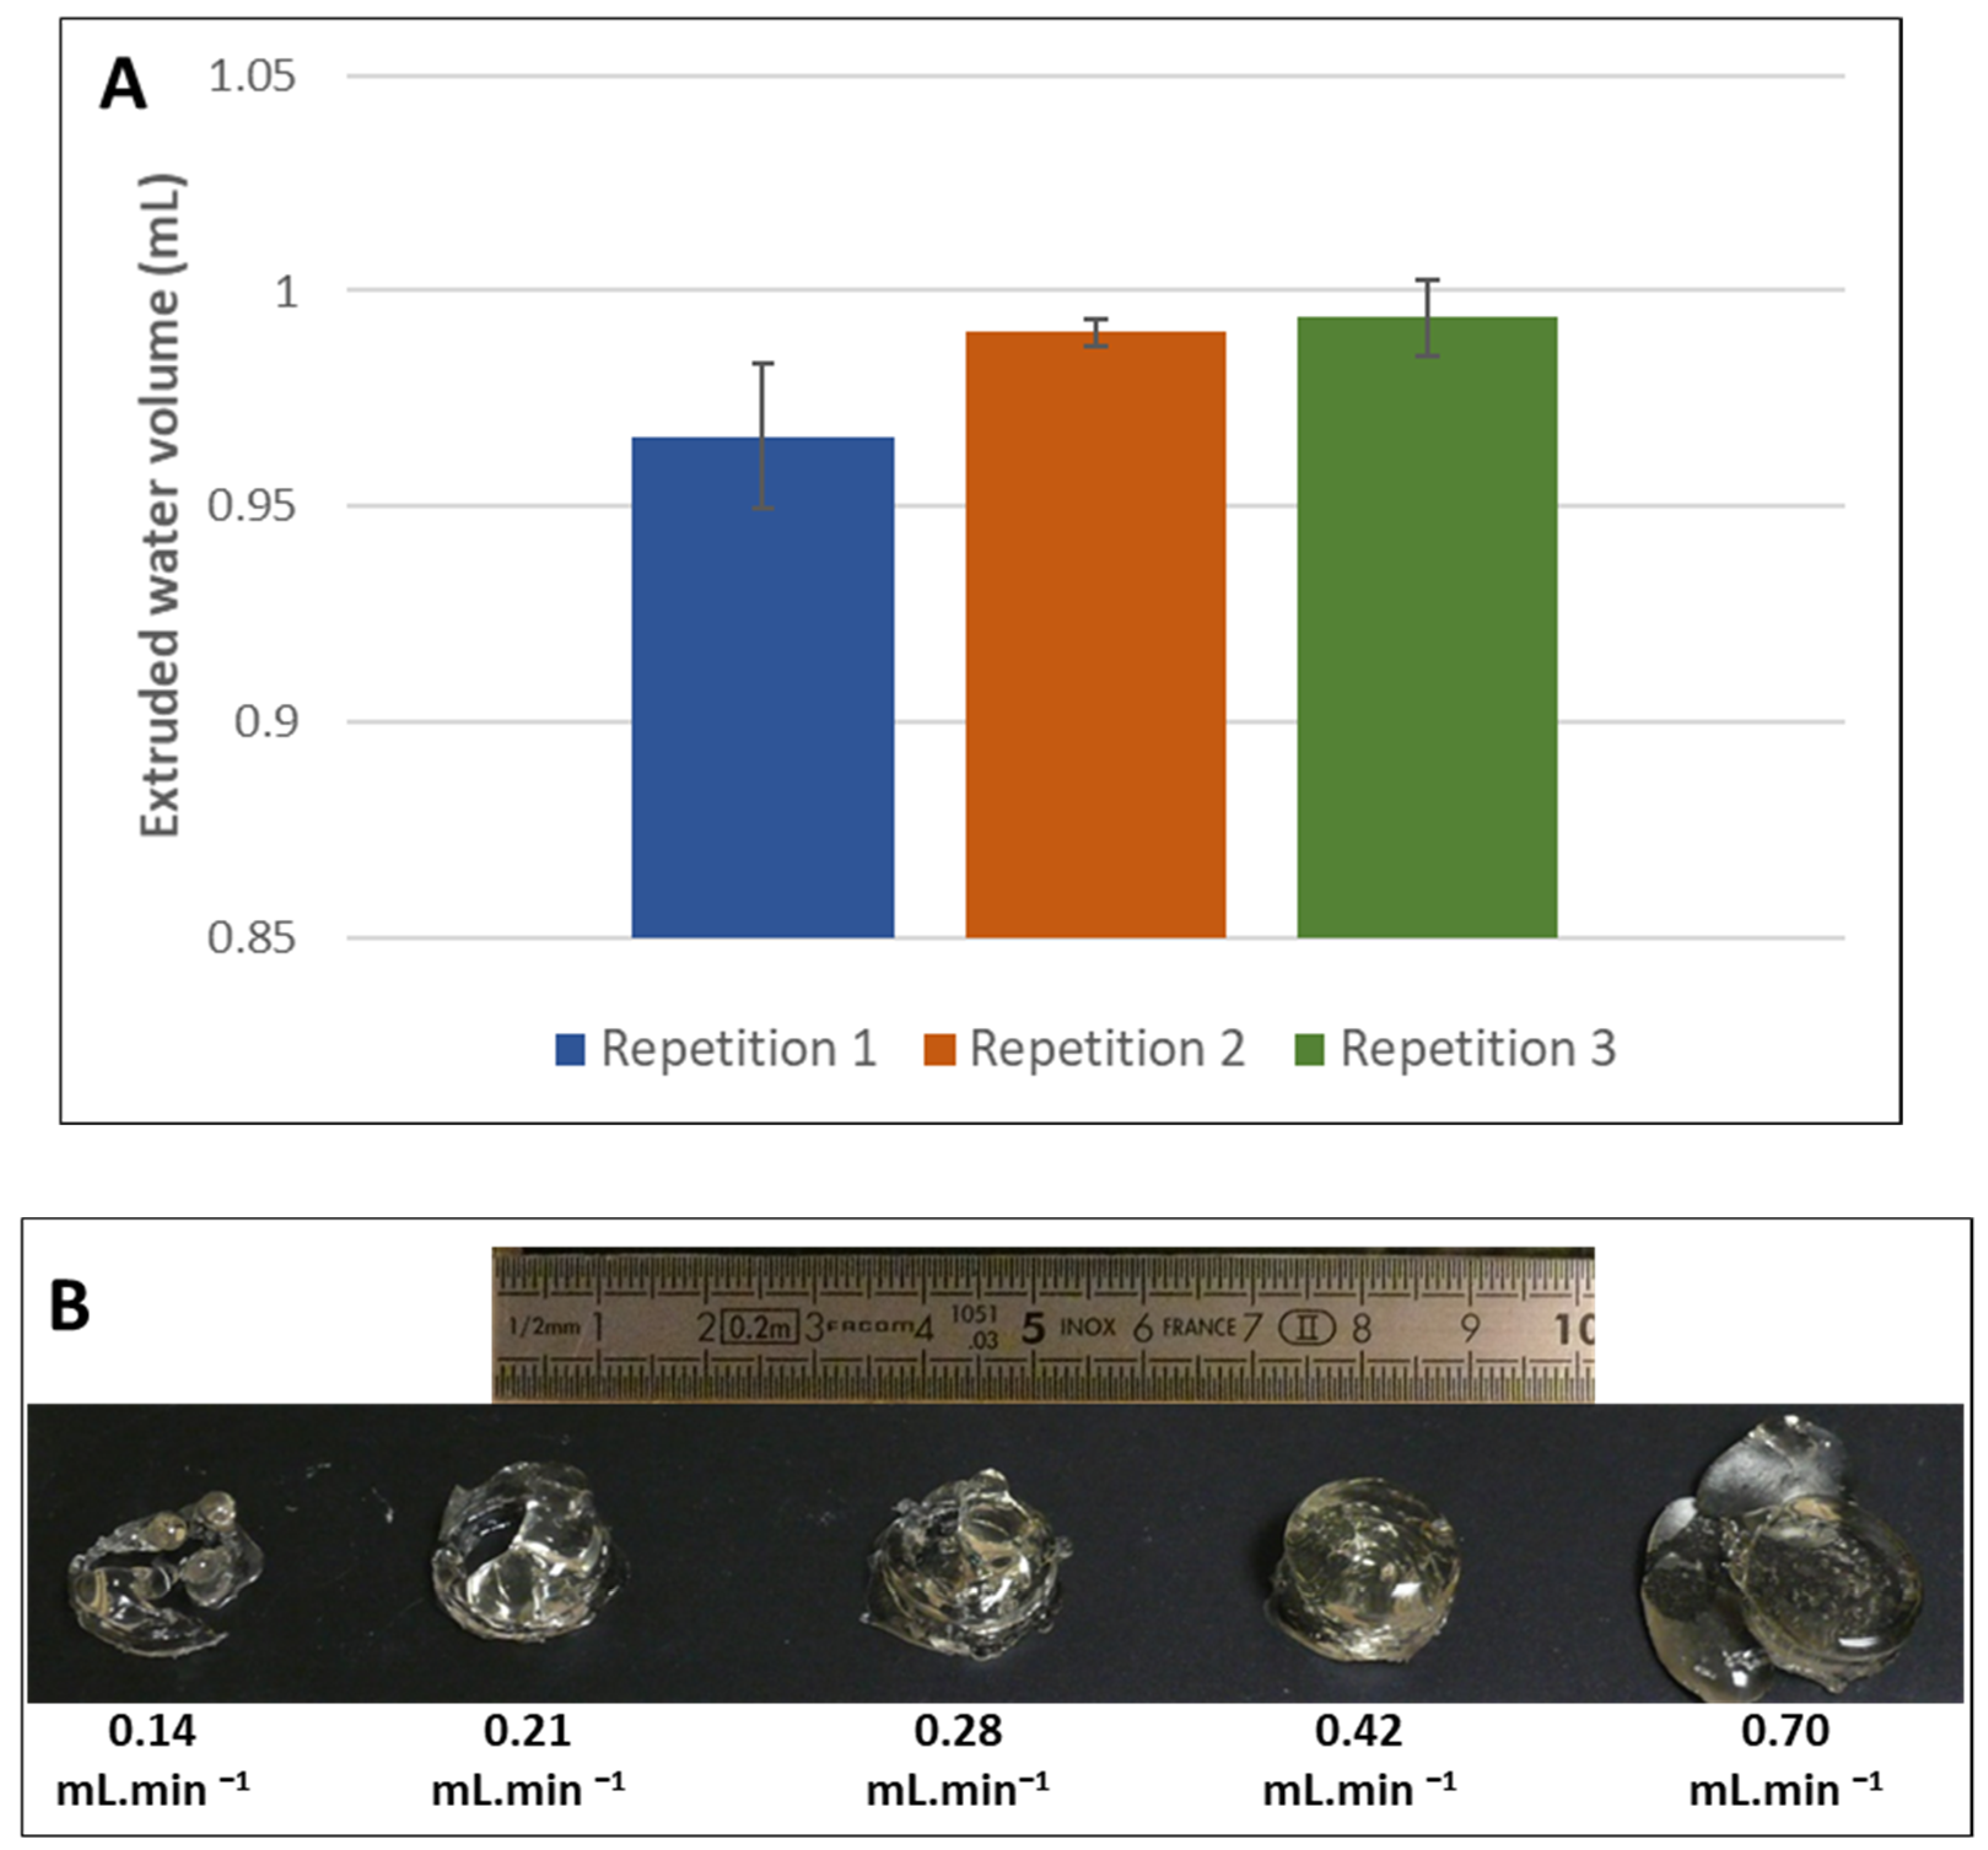
3.3.2. Effect of Temperature on Extrusion Rate
3.4. Characterization of the 3D-Printed Matrices—Effect of the Process on the Geometry and Texture of Protein Gels
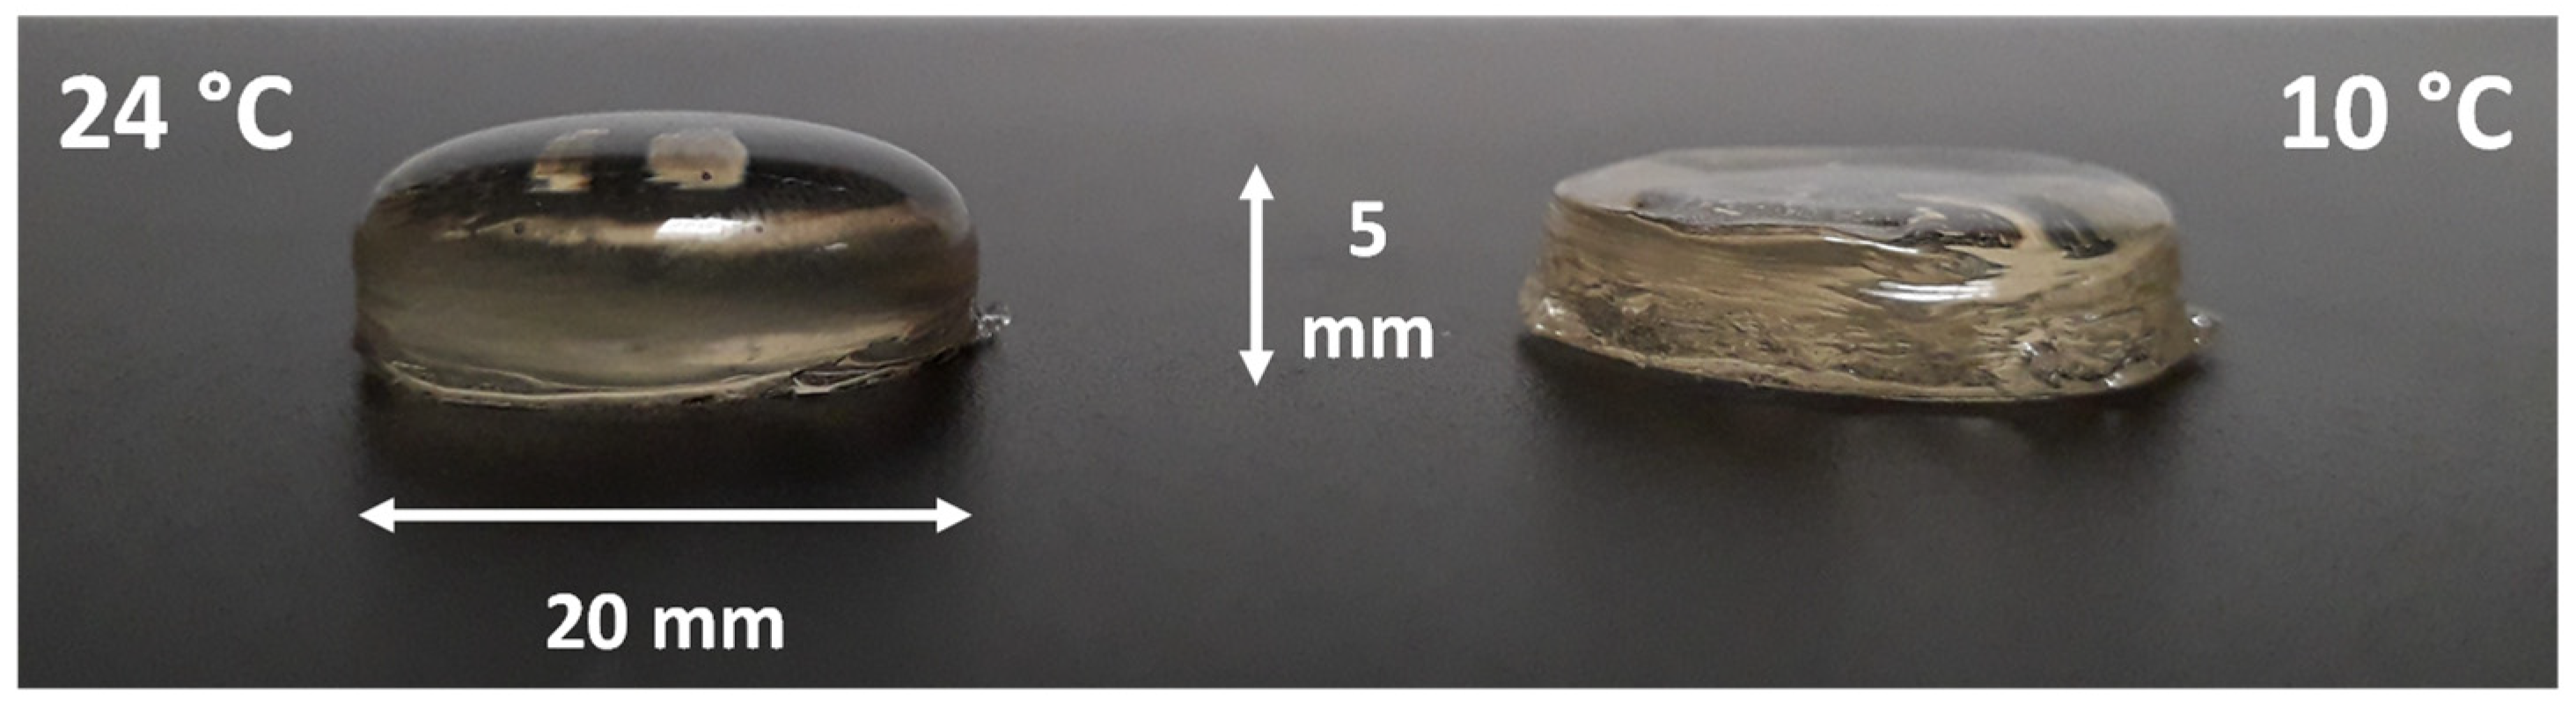
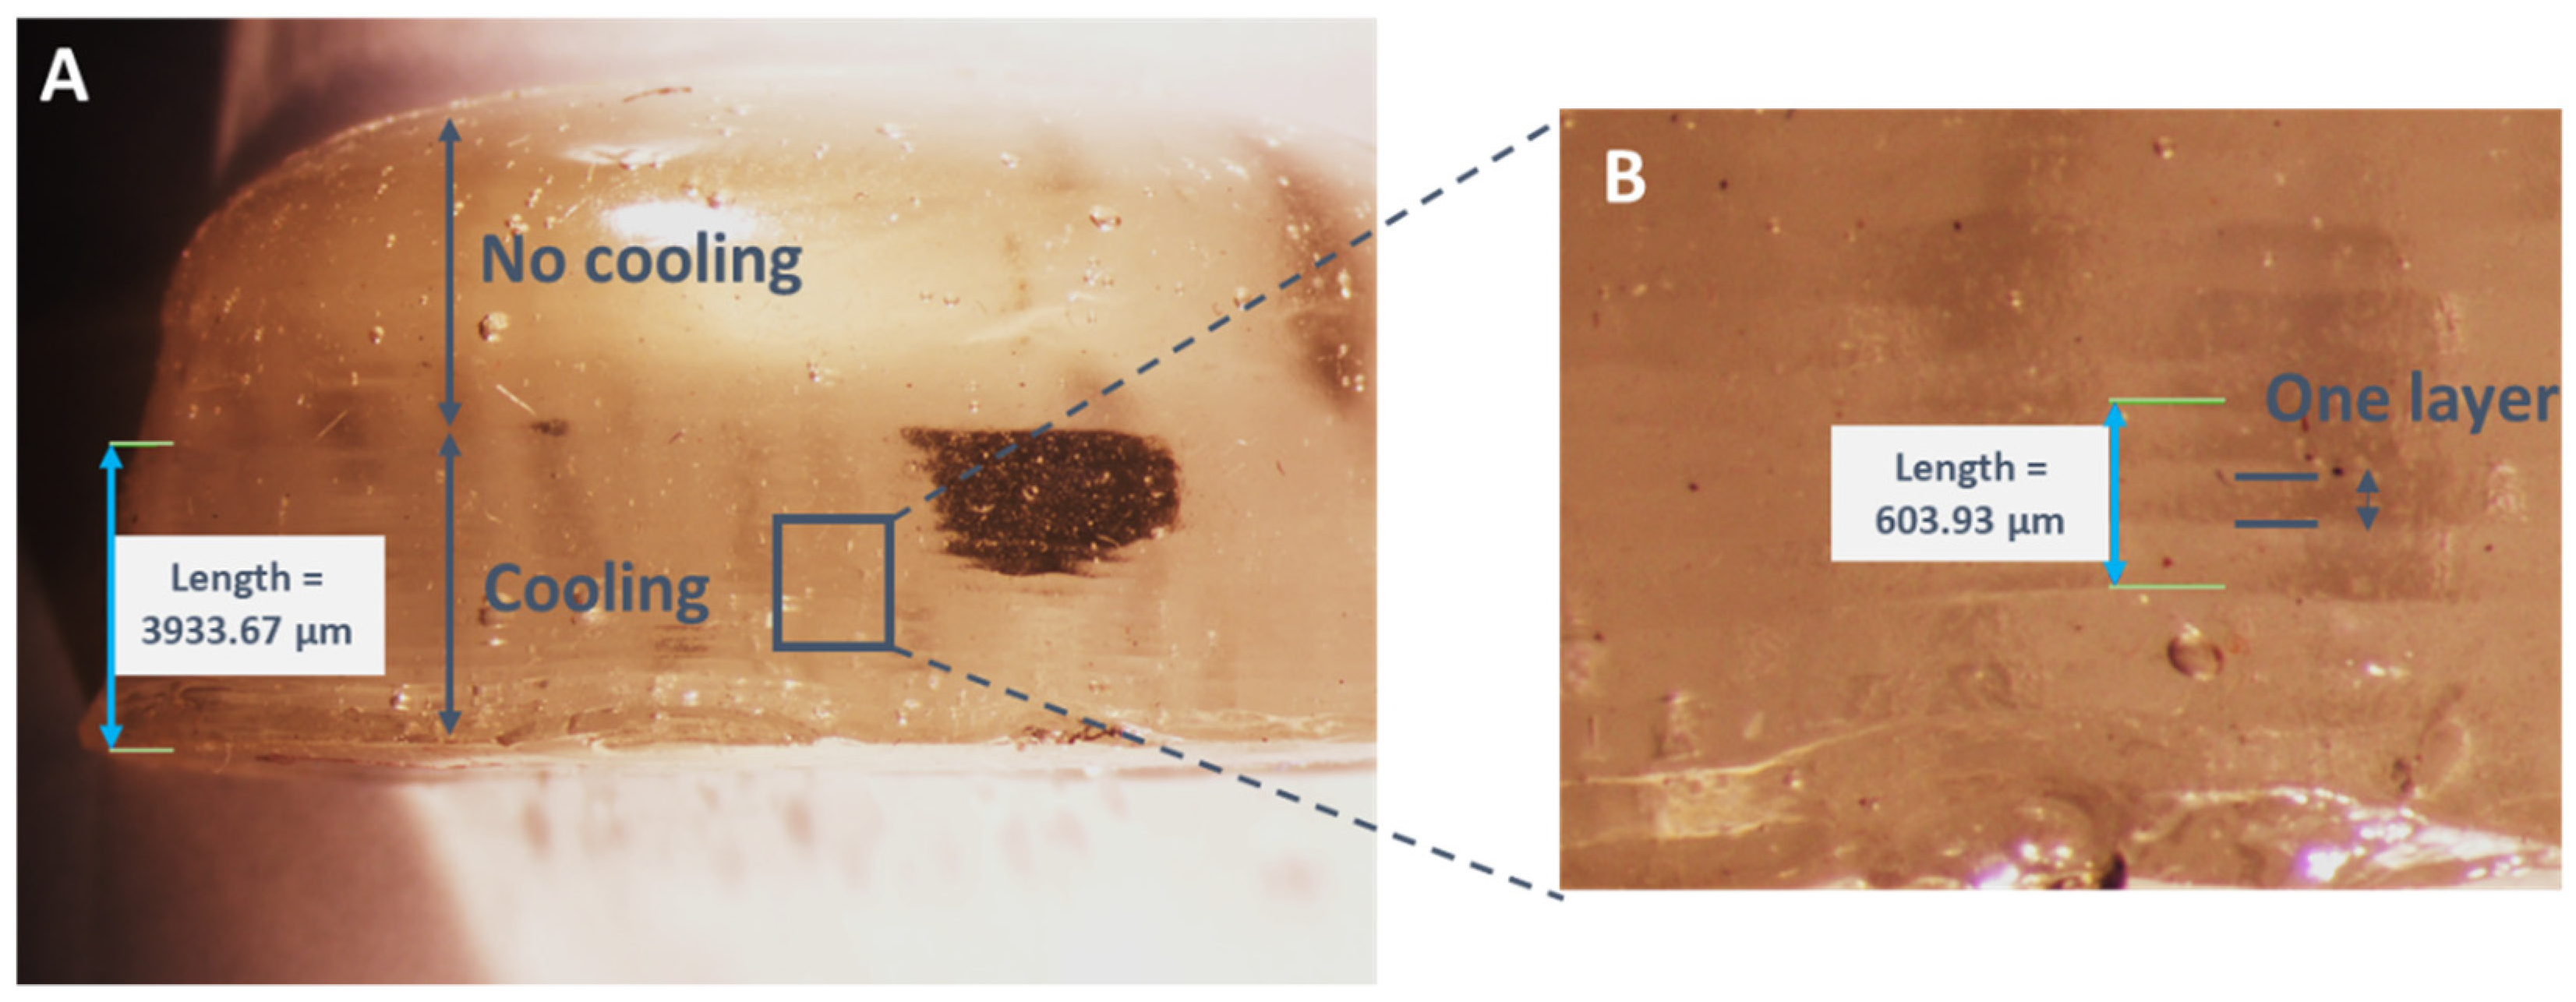
3.4.1. Geometry
3.4.2. Textural Measurements
4. Conclusions and Perspectives
Supplementary Materials
Author Contributions
Funding
Acknowledgments
Conflicts of Interest
References
- Guo, C.; Min, Z.; Bhandari, B. Model building and slicing in food 3D printing processes: A review. Compr. Rev. Food Sci. Food Saf. 2019, 18, 1052–1069. [Google Scholar] [CrossRef] [PubMed]
- Portanguen, S.; Tournayre, P.; Sicard, J.; Astruc, T.; Mirade, P.S. Toward the design of functional foods and biobased products by 3D printing: A review. Trends Food Sci. Technol. 2019, 86, 188–198. [Google Scholar] [CrossRef] [Green Version]
- Portanguen, S.; Tournayre, P.; Sicard, J.; Astruc, T.; Mirade, P.S. 3D food printing: Genesis, trends and prospects. In Future Foods: Global Trends, Opportunities, and Sustainability Challenges; Elsevier: Amsterdam, The Netherlands, 2022; Chapter 36; ISBN 978-0-323-91001-9. [Google Scholar]
- Lipton, J.I. Printable food: The technology and its application in human health. Curr. Opin. Biotechnol. 2017, 44, 198–201. [Google Scholar] [CrossRef]
- Severini, C.; Derossi, A.; Ricci, I.; Caporizzi, R.; Fiore, A. Printing a blend of fruit and vegetables. new advances on critical variables and shelf life of 3D edible objects. J. Food Eng. 2018, 220, 89–100. [Google Scholar] [CrossRef]
- Sun, J.; Zhou, W.; Yan, L.; Huang, D.; Lin, L.-Y. Extrusion-based food printing for digitalized food design and nutrition control. J. Food Eng. 2018, 220, 1–11. [Google Scholar] [CrossRef]
- Zhao, H.; Wang, J.; Ren, X.; Li, J.; Yang, Y.L.; Jin, X. Personalized food printing for portrait images. Comput. Gr. 2018, 70, 188–197. [Google Scholar] [CrossRef]
- Mantihal, S.; Prakash, S.; Godoi, F.; Bhandari, B. Optimization of chocolate 3D printing by correlating thermal and flow properties with 3D structure modeling. Innov. Food Sci. Emerg. Technol. 2017, 44, 21–29. [Google Scholar] [CrossRef] [Green Version]
- Kousani, A.Z.; Adams, S.; Whyte, D.J.; Oliver, R.; Hemsley, B.; Palmer, S.; Balandin, S. 3D printing of food for people with swallowing difficulties. In Proceedings of the International Conference on Design and Technology, Geelong, Australia, 5–8 December 2016; Knowledge E: Dubai, United Arab Emirates, 2017. [Google Scholar] [CrossRef]
- Bégin-Drolet, A.; Dussault, M.A.; Fernandez, S.A.; Larose-Dutil, J.; Leask, R.L.; Hoesli, C.A.; Ruel, J. Design of a 3D printer head for additive manufacturing of sugar glass for tissue engineering applications. Addit. Manuf. 2017, 15, 29–39. [Google Scholar] [CrossRef]
- Zeleny, P.; Ruzicka, V. The design of the 3D printer for use in gastronomy. MM Sci. J. 2017, 1744–1747. [Google Scholar] [CrossRef]
- Hurst, K.G.; Comi, T.J.; Bhargava, R. Model-guided design and characterization of a high-precision 3D printing process for carbohydrate glass. Addit. Manuf. 2018, 22, 38–50. [Google Scholar] [CrossRef]
- Diañez, I.; Gallegos, C.; Brito-de la Fuente, E.; Martínez, I.; Valencia, C.; Sánchez, M.C.; Diaz, M.J.; Franco, J.M. 3D printing in situ gelification of κ-carrageenan solutions: Effect of printing variables on the rheological response. Food Hydrocoll. 2019, 87, 321–330. [Google Scholar] [CrossRef]
- Vancauwenberghe, V.; Verboven, P.; Lammertyn, J.; Nicolaï, B. Development of a coaxial extrusion deposition for 3D printing of customizable pectin-based food simulant. J. Food Eng. 2018, 225, 42–52. [Google Scholar] [CrossRef]
- In, J.; Jeong, H.; Song, S.; Min, S.C. Determination of material requirements for 3D gel food printing using a fused deposition modeling 3D printer. Foods 2021, 10, 2272. [Google Scholar] [CrossRef] [PubMed]
- Liu, Z.; Zhang, M.; Yang, C.H. Dual extrusion 3D printing of mashed potatoes/strawberry juice gel. LWT 2018, 96, 589–596. [Google Scholar] [CrossRef]
- Kim, N.P.; Eo, J.S.; Cho, D. optimization of piston type extrusion (PTE) techniques for 3D printed food. J. Food Eng. 2018, 235, 41–49. [Google Scholar] [CrossRef]
- Severini, C.; Derossi, A.; Azzollini, D. Variables affecting the printability of foods: Preliminary tests on cereal-based products. Food Sci. Emerg. Technol. 2016, 38, 281–291. [Google Scholar] [CrossRef]
- Yang, F.; Zhang, M.; Bhandari, B.; Liu, Y. Investigation on lemon juice gel as food material for 3D printing and optimization of printing parameters. LWT 2018, 87, 67–76. [Google Scholar] [CrossRef] [Green Version]
- Wang, L.; Zhang, M.; Bhandari, B.; Yang, C. Investigation on fish surimi gel as promising food material for 3D printing. J. Food Eng. 2018, 220, 101–108. [Google Scholar] [CrossRef]
- Fretheim, K.; Egelandsdal, B.; Harbitz, O. Slow lowering of pH induces gel formation of myosin. Food Chem. 1985, 18, 169–178. [Google Scholar] [CrossRef]
- Dong, X.; Pan, Y.; Zhao, W.; Huang, Y.; Qu, W.; Pan, J.; Qi, H.; Prakash, S. Impact of microbial transglutaminase on 3D printing quality of Scomberomorus niphonius surimi. LWT 2020, 124, 109123. [Google Scholar] [CrossRef]
- Yang, G.; Tao, Y.; Wang, P.; Xu, X.; Zhu, X. Optimizing 3D printing of chicken meat by response surface methodology and genetic algorithm: Feasibility study of 3D printed chicken product. LWT 2021, 154, 112693. [Google Scholar] [CrossRef]
- Dick, A.; Bhandari, B.; Prakash, S. 3D printing of meat. Meat Sci. 2019, 153, 35–44. [Google Scholar] [CrossRef]
- Dick, A.; Bhandari, B.; Prakash, S. Post-processing feasibility of composite-layer 3D printed beef. Meat Sci. 2019, 153, 9–18. [Google Scholar] [CrossRef] [PubMed]
- Schreuders, F.K.G.; Schlangen, M.; Kyriakopoulou, K.; Boom, R.M.; van der Goot, A.J. Texture methods for evaluating meat and meat analogue structures: A review. Food Control. 2021, 157, 108103. [Google Scholar] [CrossRef]
- Tournayre, P.; Portanguen, S.; Sicard, J.; Mirade, P.S. Study and realization of a 3D dual print head for meat-based food products. In Proceedings of the 32nd EFFoST International Conference, Nantes, France, 6–8 November 2018; Available online: https://hal.inrae.fr/hal-02785141/document (accessed on 13 December 2021).
- Portanguen, S.; Tournayre, P.; Sicard, J.; Astruc, T.; Mirade, P.S. Conception d’aliments à fonctionnalités ciblées par impression 3D. In Proceedings of the XVIIème Congrès de la Société Française de Génie des Procédés, Nantes, France, 5–14 July 2020; Available online: https://hal.archives-ouvertes.fr/hal-02330240/document (accessed on 13 December 2021).
- Bousquet, C. Rôle des Pluronics sur les Propriétés Rhéologiques, de Séchage et de Fracturation des gels Aspirables de Décontamination. Chimie Théorique, Physique et Analytique. Ph.D. Thesis, Université de Montpellier II, Montpellier, France, 2007. Available online: https://www.osti.gov/etdeweb/servlets/purl/21036320 (accessed on 13 December 2021).
- Zhang, Y.; Wang, Z.; Zhang, Y.; Gomes, S.; Bernard, A. Bio-inspired generative design for support structure generation and optimization in additive manufacturing (Am). CIRP Ann. 2020, 69, 117–120. [Google Scholar] [CrossRef]
- Harkouss, R.; Chevarin, C.; Daudin, J.-D.; Sicard, J.; Mirade, P.-S. Development of a multi-physical finite element-based model that predicts water and salt transfers, proteolysis and water activity during the salting and post-salting stages of the dry-cured ham process. J. Food Eng. 2018, 218, 69–79. [Google Scholar] [CrossRef]
- Stavropoulos, P.; Papacharalampopoulos, A.; Michail, C.K.; Chryssolouris, G. Robust Additive Manufacturing Performance through a Control Oriented Digital Twin. Metals 2021, 11, 708. [Google Scholar] [CrossRef]


| Printing Technology | Type of Food | Print Speed (mm.s−1) | Travel Speed (mm.s−1) | Extrusion Rate (mL.min−1) | Nozzle/Needle Diameter (mm) | Infill Level (%) | Layer Thickness (mm) | Ref. |
|---|---|---|---|---|---|---|---|---|
| Syringe pump made of stainless steel (1.3 b pressure) | Mixture of fruits/vegetables + fish collagen | 11–21 | 20 | / | 1.2 | 25 | 1.1 | [5] |
| Syringe pump | Sugar | 20–50 | / | / | 1 | / | / | [10] |
| Coaxial extrusion | Pectin/CaCl2 | 10 | 200 | 0.34 | 0.838 | 85 | 0.838 | [14] |
| Syringe pump | Mashed potatoes/strawberry juice gel | 25 | / | / | / | 40–100 | 1.2 | [16] |
| Syringe pump | Various foods (viscosity 1.1.10−3 to 103 Pa.s) | 15–20 | 15–20 | / | / | / | / | [17] |
| Piston (4 b pressure) | Cereal dough | 30 | 50 | / | 0.6 | 10–20 | 0.3–0.5 | [18] |
| Auger mixer + conveyor | Lemon juice gel + potato starch | 30 | / | 1.44 | 1 | / | / | [19] |
| Auger mixer + conveyor | Surimi | 28 | / | 0.18 | 2 | / | / | [20] |
| Original Parts 1/Modified Devices 2 | Advantages | Disadvantages |
|---|---|---|
| Printhead 2 | Double extrusion | Displacement limited to 20 mm in z-axis |
| Extruder 2 | Simple design | Poor retraction |
| Syringe holder 2 | Adapted to the printing volume | Non-ergonomic |
| Printing plate 1 | No modifications | No cold control |
Publisher’s Note: MDPI stays neutral with regard to jurisdictional claims in published maps and institutional affiliations. |
© 2022 by the authors. Licensee MDPI, Basel, Switzerland. This article is an open access article distributed under the terms and conditions of the Creative Commons Attribution (CC BY) license (https://creativecommons.org/licenses/by/4.0/).
Share and Cite
Portanguen, S.; Tournayre, P.; Gibert, P.; Leonardi, S.; Astruc, T.; Mirade, P.-S. Development of a 3D Printer for the Manufacture of Functional Food Protein Gels. Foods 2022, 11, 458. https://0-doi-org.brum.beds.ac.uk/10.3390/foods11030458
Portanguen S, Tournayre P, Gibert P, Leonardi S, Astruc T, Mirade P-S. Development of a 3D Printer for the Manufacture of Functional Food Protein Gels. Foods. 2022; 11(3):458. https://0-doi-org.brum.beds.ac.uk/10.3390/foods11030458
Chicago/Turabian StylePortanguen, Stéphane, Pascal Tournayre, Paul Gibert, Selma Leonardi, Thierry Astruc, and Pierre-Sylvain Mirade. 2022. "Development of a 3D Printer for the Manufacture of Functional Food Protein Gels" Foods 11, no. 3: 458. https://0-doi-org.brum.beds.ac.uk/10.3390/foods11030458